A factory-built fireplace is not a generic fireplace.
That sounds obvious, but it is one of the most important distinctions in fireplace and chimney inspection reporting.
A masonry fireplace is largely evaluated as a site-built structure. A factory-built fireplace is different. It is a listed system made from specific factory-made components, installed under specific listing conditions, with manufacturer instructions that often control the details of the installation.
That difference should show up in the inspection report.
A report that only says “factory-built fireplace inspected” may not be enough. It may identify the category, but not the system. It may show photos, but not preserve the model information. It may describe visible conditions, but not explain whether the manufacturer, model, chimney system, accessories, or installation instructions could be verified.
For factory-built fireplaces, model-specific documentation matters.
The Model Is Part of the Inspection Record
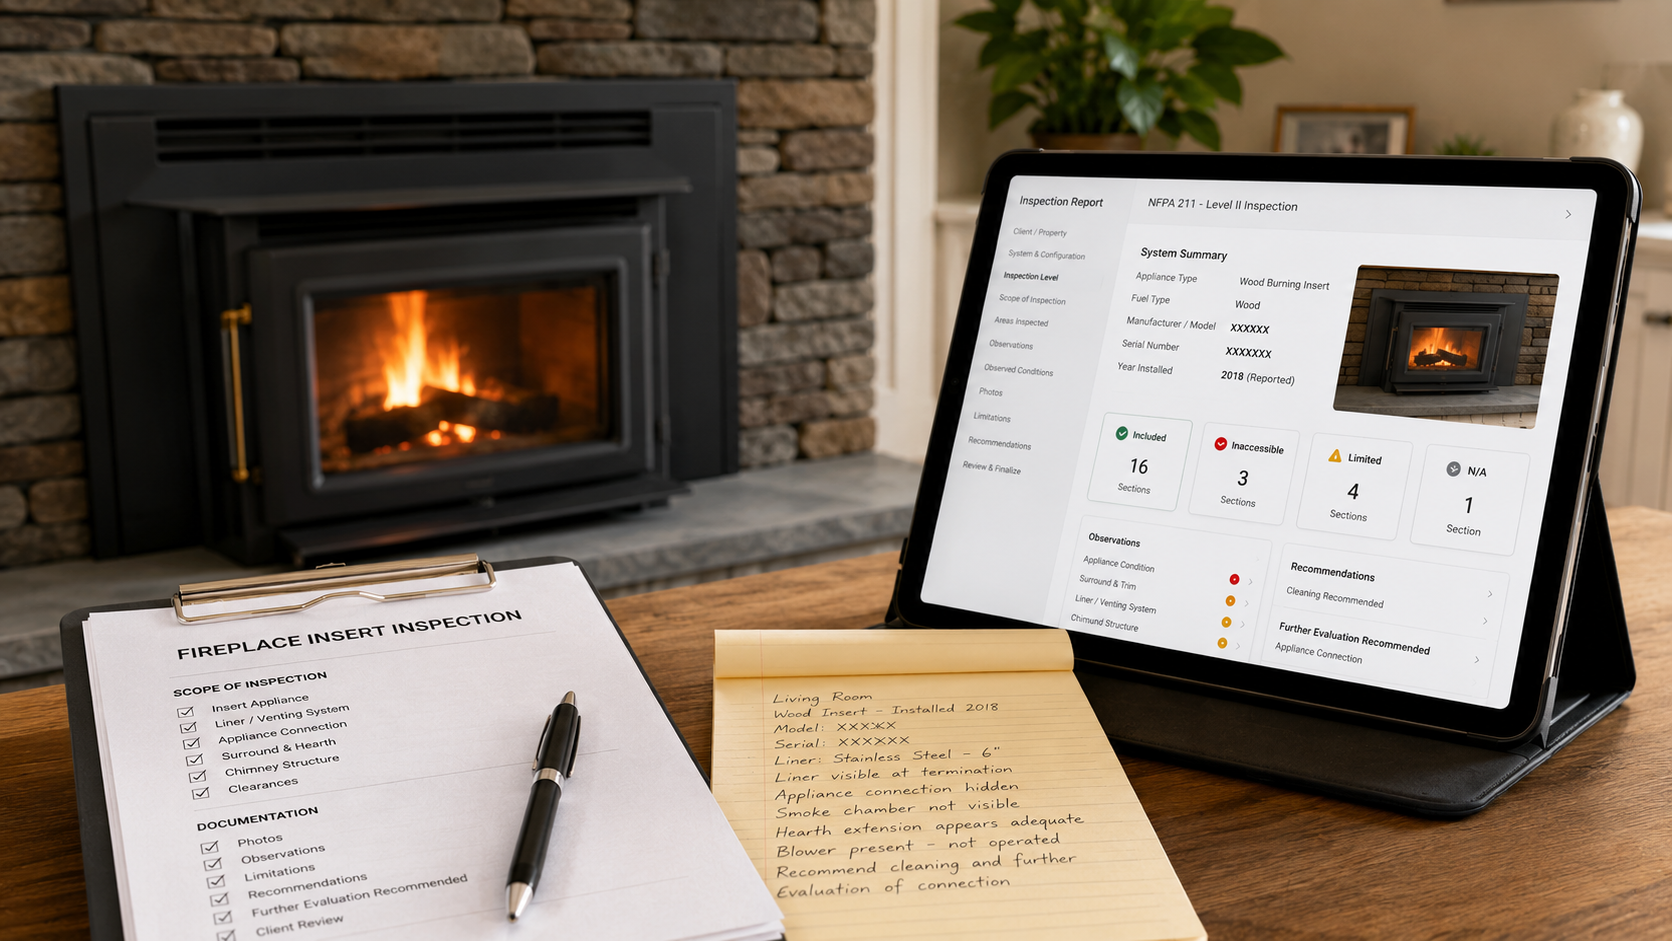
A factory-built fireplace report should begin by identifying the system as specifically as reasonably possible.
At minimum, the report should attempt to document:
- fireplace manufacturer;
- fireplace model number;
- serial number when visible;
- listing label status;
- fuel type;
- appliance configuration;
- chimney or vent system type;
- visible chimney manufacturer or system identification;
- termination type;
- visible listed accessories;
- doors, louvers, panels, grates, refractory panels, and other visible components;
- whether manufacturer instructions were available for review.
This does not mean every inspection can verify every item.
In older homes, labels may be missing, painted, corroded, concealed, covered by trim, damaged, or inaccessible. Manuals may be unavailable. Replacement parts may not be original. Decorative shrouds, doors, gas log sets, inserts, caps, chase covers, terminations, refractory panels, or chimney sections may have been modified or replaced over time.
That is exactly why the report needs clear documentation.
If the model information is visible, document it.
If it is not visible, document the Limitation.
If the model cannot be verified, do not silently treat the system as verified.
A Label Is Evidence
A listing label is not just a photo to include in the report.
It is evidence of system identity.
When a label is present and readable, the report can use that information to identify the appliance and support further evaluation against manufacturer instructions.
When a label is missing or unreadable, the report should not pretend the system is fully identified.
Those are different report conditions.
A strong report may document:
The visible rating/listing label was present and readable. Manufacturer and model information were documented from the label.
Or:
The rating/listing label was not located during the inspection. Manufacturer and model information could not be verified from visible labeling. Further Evaluation Recommended before relying on compatibility, listing, or manufacturer-specific installation conclusions.
Or:
The visible label was present but damaged/unreadable. Manufacturer and model information could not be confirmed from the label.
Those statements are more useful than a generic checkbox that says “factory-built fireplace.”
The report should preserve what was actually verified.
Manufacturer Instructions Are Not Optional Context
Factory-built fireplace inspection often depends on the manufacturer’s installation instructions.
That does not mean the inspector guarantees that every concealed installation detail matches the manual. It also does not mean the inspector can verify every listed component during a standard inspection.
It means the report should identify whether the manual was available and whether visible conditions were compared to known manufacturer requirements.
A professional report should be able to distinguish between:
- manufacturer instructions reviewed;
- manufacturer instructions not available;
- model could not be identified;
- visible condition appears inconsistent with available instructions;
- component compatibility could not be verified;
- concealed areas prevented confirmation;
- Further Evaluation Recommended.
That distinction matters because factory-built systems are model-specific. Clearance, support, firestopping, chimney sections, termination components, outside-air components, hearth extensions, doors, and accessories may depend on the listing and instructions for that specific system.
A report should not imply that the inspector verified manufacturer compliance if the model and manual were not available.
Components Are Not Interchangeable by Default
Factory-built fireplaces are often altered over time.
Common examples include:
- replacement doors;
- missing or damaged refractory panels;
- aftermarket refractory panels;
- changed grates;
- decorative shrouds;
- chase covers and terminations;
- gas log sets;
- fireplace inserts;
- chimney caps;
- outside-air components;
- blower kits;
- trim kits;
- modified louvers;
- field-fabricated repairs.
Some of those items may be acceptable for a specific system. Some may not be. Some may require manufacturer documentation, listing information, or further evaluation by the manufacturer, AHJ, or qualified professional.
The report should not reduce those conditions to vague language such as:
Fireplace has aftermarket parts.
That may be true, but it is incomplete.
Better documentation separates the Observation from the Recommendation.
Observation:
Replacement fireplace doors were present. Compatibility with the listed factory-built fireplace model was not verified from visible labeling or available manufacturer instructions.
Recommendation:
Further Evaluation Recommended before use to verify whether the doors are listed or approved for use with this specific factory-built fireplace model.
That structure preserves the inspector’s logic.
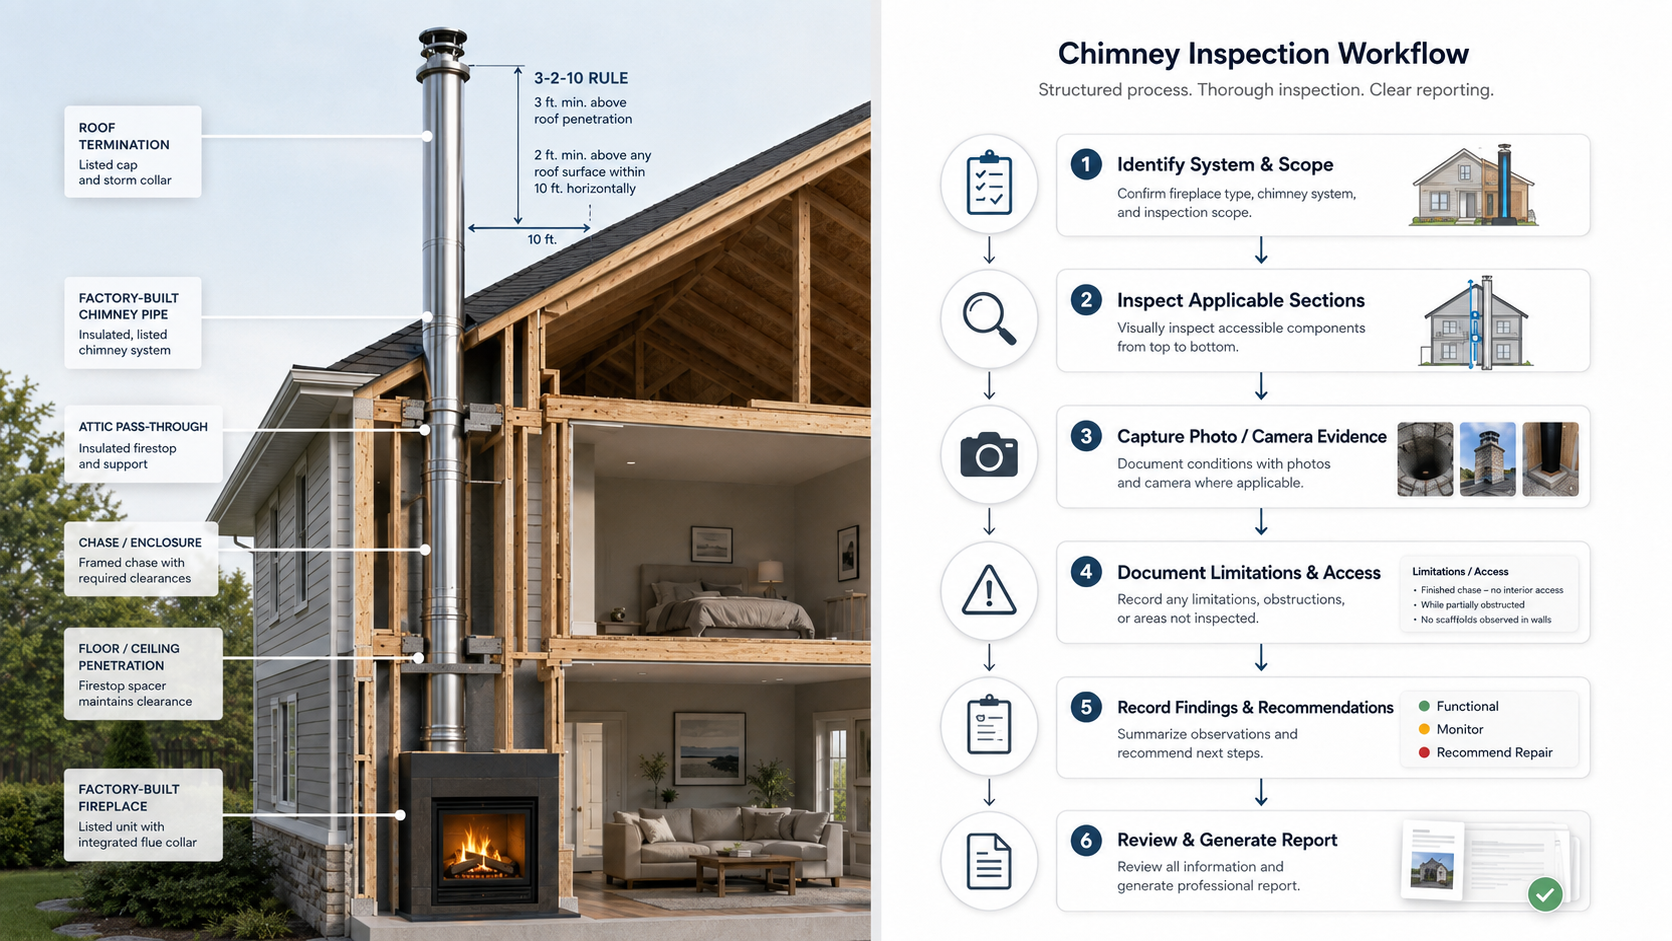
The Chimney System Also Needs Identity
A factory-built fireplace is not just the firebox.
The chimney system matters.
A report should document visible chimney-system information when available, including:
- chimney pipe type;
- visible manufacturer label or markings;
- diameter;
- termination style;
- chase condition;
- visible offsets;
- attic or chase access;
- support and firestop visibility;
- exterior corrosion or damage;
- whether the chimney appears to be part of the listed fireplace system;
- whether visible components are damaged, missing, altered, or unverifiable.
The report should avoid overstating concealed information.
For example, if attic access is blocked, the report should not imply the firestop, support box, chimney clearance, or chase interior was evaluated.
A stronger report states the Limitation:
Attic access was Inaccessible at the time of inspection. Firestop, support, and concealed chimney-clearance conditions could not be evaluated from that area.
That is not defensive writing.
It is accurate writing.
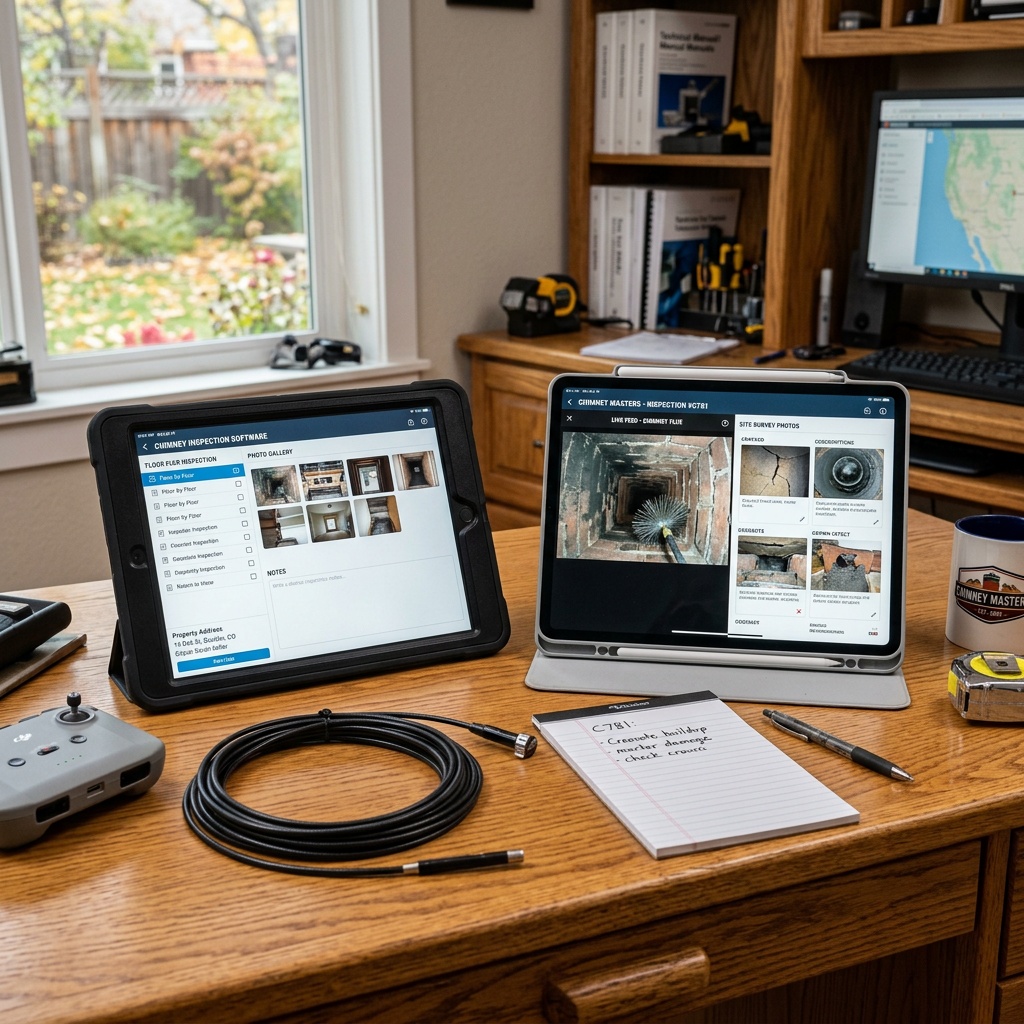
Internal Camera Inspection Has Limits
Internal camera inspection of the flue can provide valuable visual evidence.
It can help document visible interior conditions, offsets, obstructions, joint conditions, deterioration, corrosion, damaged sections, debris, bird nesting, or other accessible internal conditions.
But the internal camera inspection does not verify every part of a factory-built fireplace system.
It may not verify:
- manufacturer model;
- listing compatibility;
- clearance to combustibles;
- chase construction;
- attic firestopping;
- hidden support conditions;
- concealed exterior-air components;
- whether accessories are listed for the model;
- whether prior repairs used correct replacement parts.
The report should explain what the internal camera inspection did and did not document.
A stronger report may say:
Internal camera inspection of the flue was performed from the fireplace opening. Visible interior chimney sections were documented where accessible. This inspection did not verify concealed clearances, listed component compatibility, or manufacturer-specific accessory approval.
That is clearer than:
Camera inspection completed.
“Nothing to Report” Must Not Hide Missing Model Information
Nothing to Report is useful only when it means the section was included and observed within the applicable scope, and no reportable Observed Condition was documented.
It should not be used to hide missing model identity.
For example:
- If the label was visible and no reportable label issue was observed, Nothing to Report may be appropriate for that label section.
- If the label was missing, that is not Nothing to Report.
- If the label was hidden by trim and could not be viewed, that is a Limitation or Inaccessible condition.
- If the manual was not available, that should be documented as a Limitation or documentation gap.
- If compatibility could not be verified, that should be stated clearly.
A factory-built fireplace report should not make “no visible damage” sound the same as “system identity verified.”
Those are different conclusions.
Home Inspectors Need Clear Referral Language
Home inspectors often observe factory-built fireplaces during general home inspections.
That does not automatically mean they have performed a chimney-specific inspection, verified manufacturer instructions, confirmed the listing, or evaluated concealed chimney-system components.
A clear general home inspection statement may say:
A factory-built fireplace was observed. Manufacturer/model information and internal chimney-system conditions were not fully evaluated as part of this general home inspection. Further Evaluation Recommended by a qualified chimney/fireplace professional before use or closing.
If the home inspector observes missing panels, corrosion, altered doors, damaged chase components, inadequate clearances, visible fire damage, missing labels, or a fireplace insert installed into a factory-built fireplace, the referral should become more specific.
The goal is not to overstate the inspection.
The goal is to preserve the boundary.
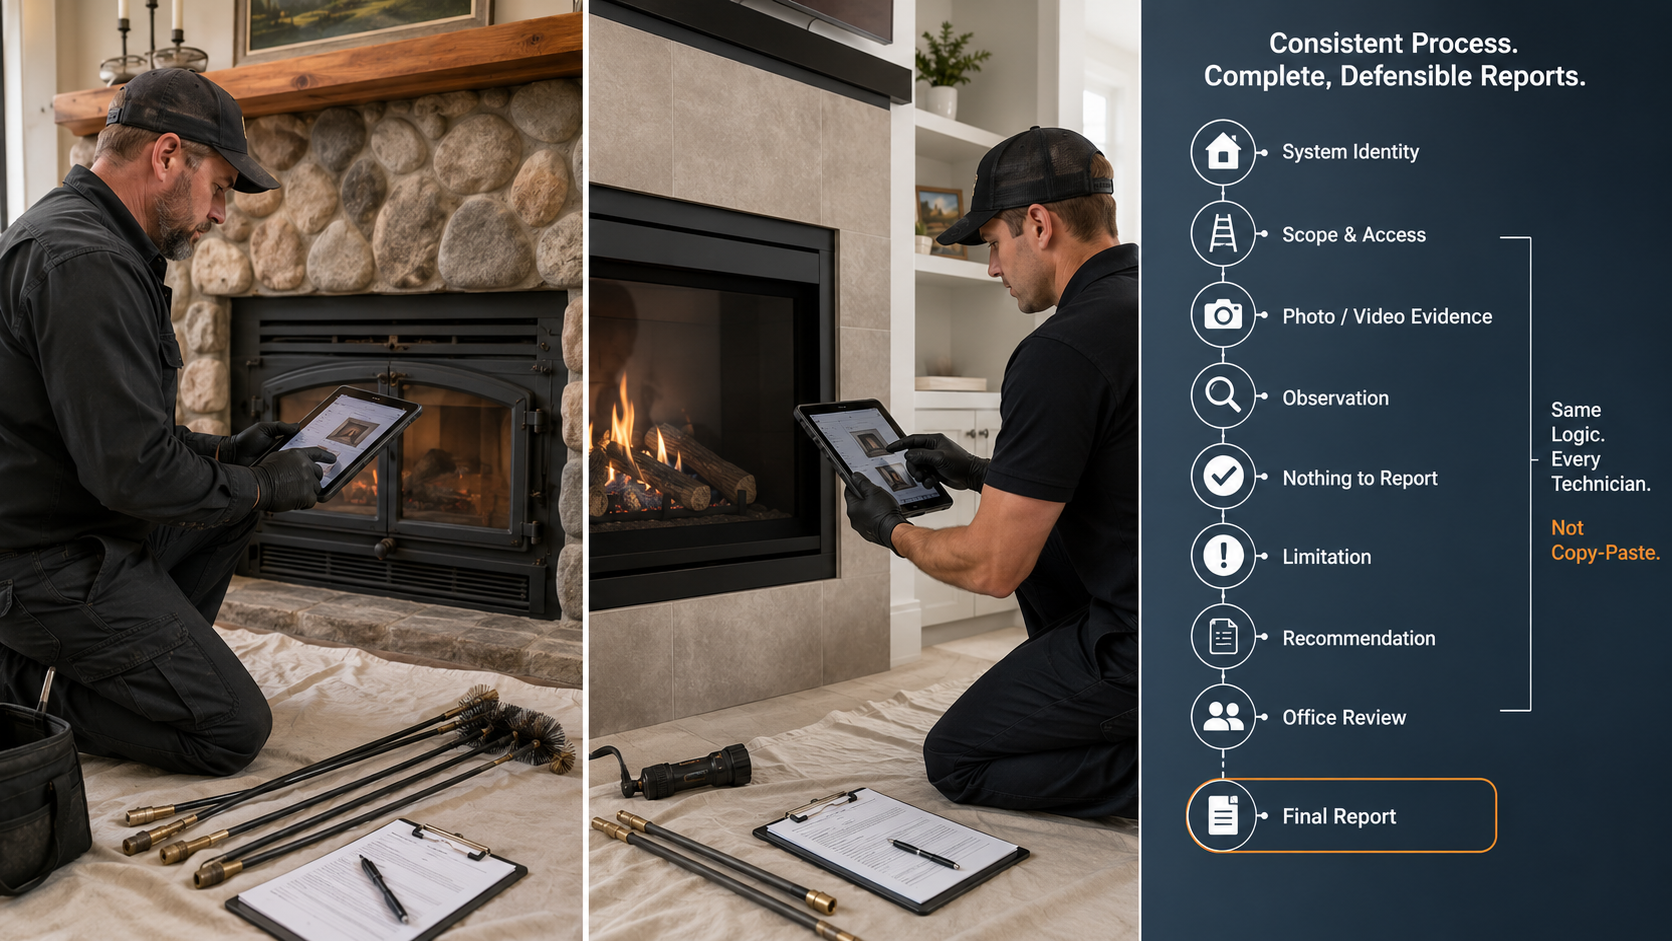
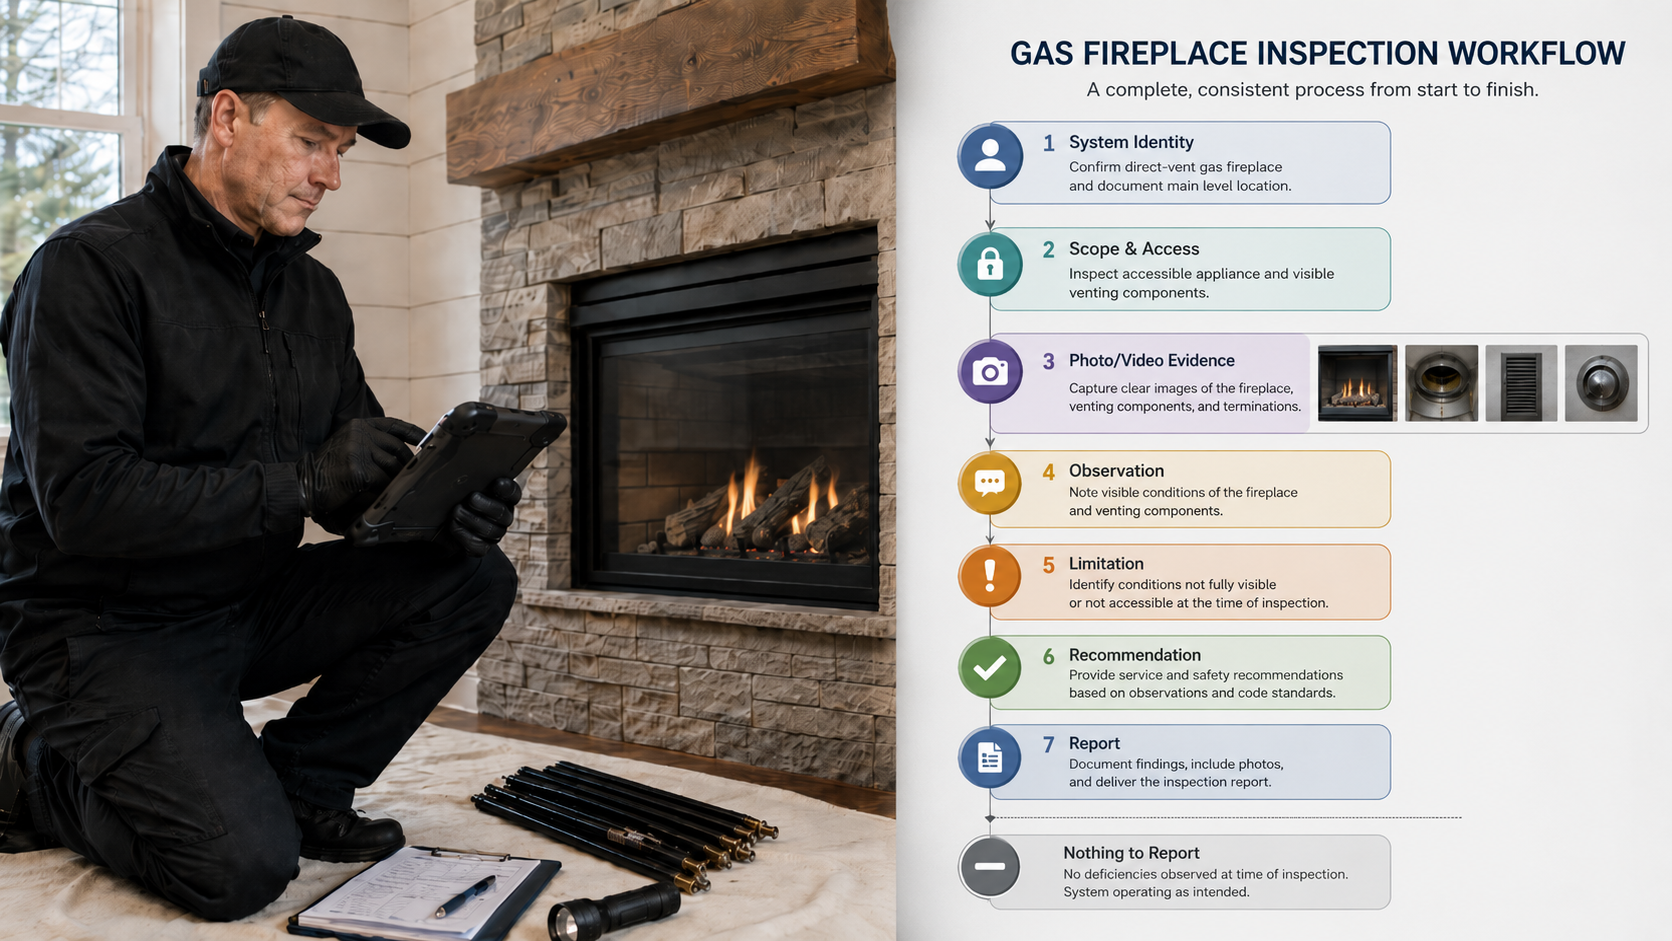
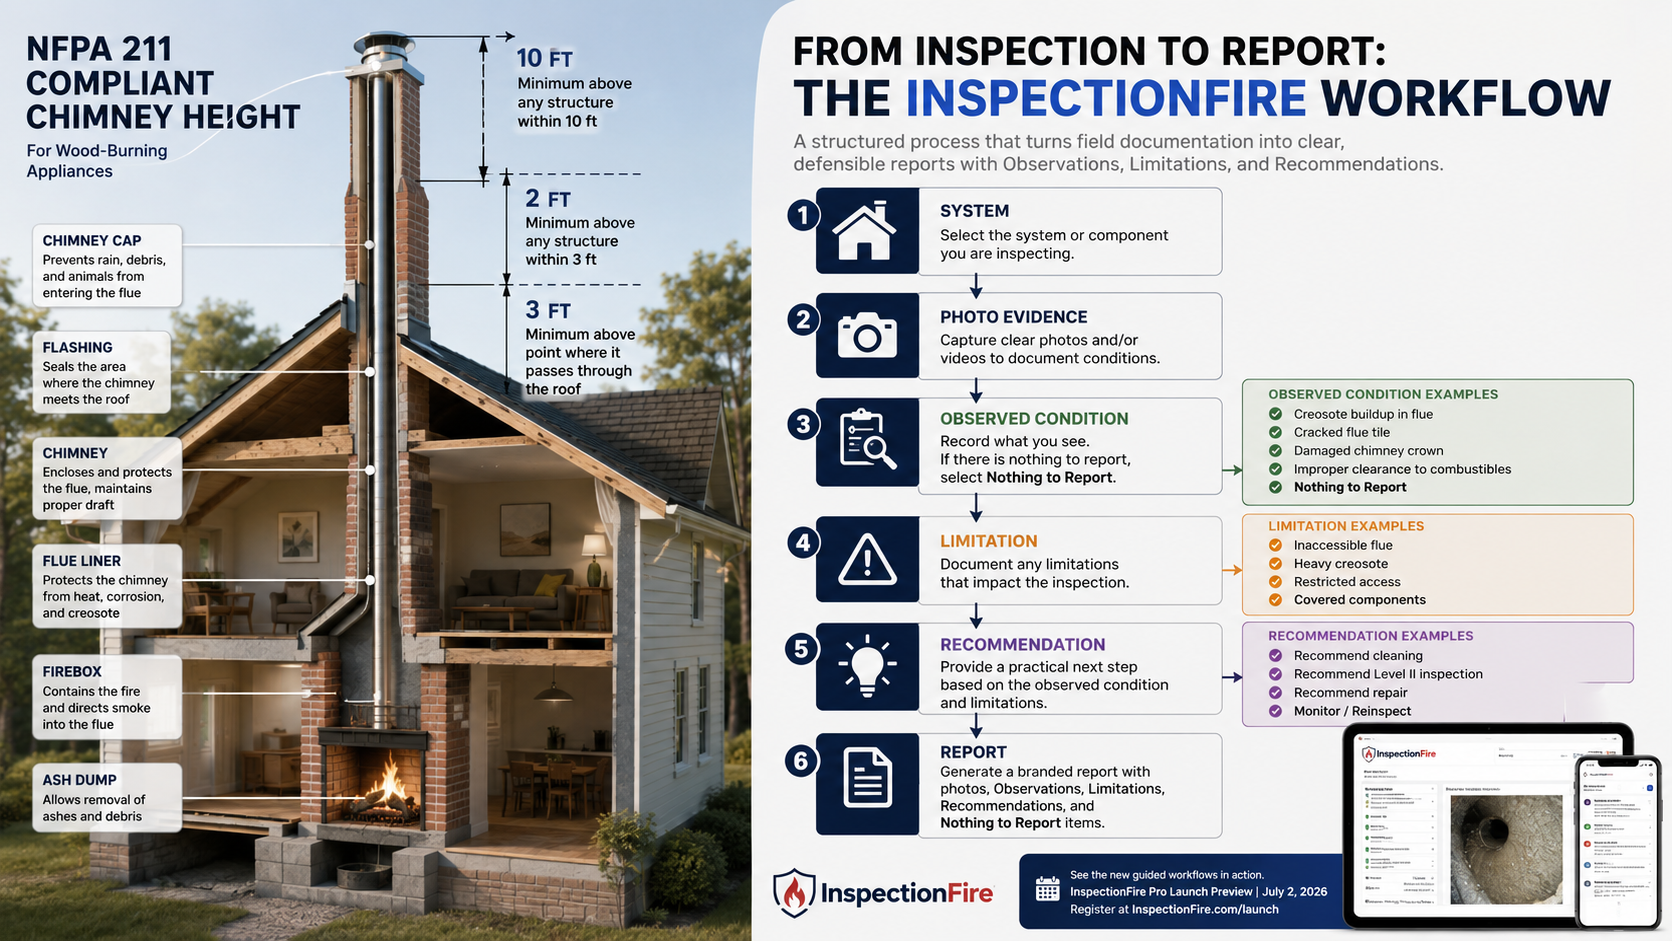
What Factory-Built Fireplace Inspection Software Should Document
Chimney inspection software should not treat a factory-built fireplace as a generic room note.
A stronger workflow should help document:
- system identity;
- manufacturer;
- model;
- serial number;
- listing-label status;
- manual availability;
- fuel type;
- appliance type;
- chimney or vent system;
- visible components;
- accessory status;
- Included areas;
- Excluded areas;
- Inaccessible areas;
- Not Applicable sections;
- Limitations;
- Observations;
- Observed Conditions;
- internal camera inspection of the flue;
- photo evidence;
- Recommendations;
- Further Evaluation Recommended;
- final report review.
This structure is especially useful when the model is not known.
Good software should not force the inspector to choose between “acceptable” and “defective” when the accurate answer is:
Model-specific compatibility could not be verified from visible labeling or available documentation.
That is a real inspection result.
The report should have a place for it.
Why This Matters for Chimney Companies
Factory-built fireplace documentation affects more than the report layout.
It affects:
- client understanding;
- office review;
- repair planning;
- replacement-part research;
- manufacturer manual lookup;
- AHJ communication;
- insurance communication;
- real estate negotiations;
- use recommendations;
- future service calls.
If the report does not identify the model, the office may not be able to research the correct manual.
If the report does not explain that the label was missing, the client may think the system was fully identified.
If the report does not separate visible Observations from unverifiable compatibility, the Recommendation may appear stronger or weaker than the evidence supports.
That is why factory-built fireplace reporting needs structure.
How InspectionFire Supports Better Factory-Built Fireplace Documentation
InspectionFire is built for chimney, fireplace, venting, and appliance documentation.
For factory-built fireplaces, the value is not just producing a cleaner PDF.
The value is preserving the system record.
A disciplined workflow helps the inspector document the fireplace as a specific system, not just a generic appliance. It helps keep photos, Observations, Limitations, internal camera inspection information, manual notes, and Recommendations connected to the correct fireplace, chimney, vent, or appliance.
That matters when the system has missing labels, altered components, inaccessible areas, manufacturer-specific requirements, or conditions that require Further Evaluation Recommended.
The report should not depend on memory.
It should show what was verified, what was observed, what was limited, and what could not be confirmed.
Bottom Line
Factory-built fireplace inspection reports need model-specific documentation.
The report should attempt to identify the manufacturer, model, listing label, manual availability, chimney system, visible components, accessories, Limitations, Observations, Observed Conditions, and Recommendations.
When that information cannot be verified, the report should say so clearly.
That is not a weakness in the report.
It is the report doing its job.
See the Difference. Schedule a Walkthrough.
InspectionFire helps chimney, fireplace, venting, and inspection professionals document factory-built fireplaces with clearer system identity, photo evidence, internal camera inspection records, Limitations, Observations, Recommendations, and final report review.
Schedule a walkthrough to see how the workflow supports better fireplace and chimney inspection documentation.
FAQ
What should a factory-built fireplace inspection report include?
A factory-built fireplace inspection report should include the fireplace manufacturer, model, serial number when visible, label status, manual availability, fuel type, chimney or vent system, visible components, Limitations, Observations, Observed Conditions, Recommendations, and internal camera inspection documentation where applicable.
Why does the fireplace model number matter?
The model number matters because factory-built fireplaces are listed systems. Clearances, accessories, replacement components, doors, chimney systems, terminations, and installation requirements may depend on the specific manufacturer and model.
What if the factory-built fireplace label is missing?
If the label is missing, damaged, concealed, or unreadable, the report should document that as a Limitation or Inaccessible condition. The report should not imply that manufacturer/model information was verified.
Is an internal camera inspection enough to verify a factory-built fireplace?
No. Internal camera inspection of the flue can document visible interior conditions, but it does not verify every concealed clearance, listed component, accessory approval, manufacturer model, or installation detail.
Should a home inspector report on factory-built fireplace model information?
A home inspector may document visible manufacturer/model information when readily available, but a general home inspection should not imply a chimney-specific factory-built fireplace inspection unless that service was included, performed, and documented within a defined scope.
What does “Further Evaluation Recommended” mean in a factory-built fireplace report?
Further Evaluation Recommended means the observed condition, missing information, inaccessible area, or unverifiable compatibility requires additional review by a qualified professional, manufacturer, AHJ, or other appropriate party before relying on the system for continued use.
How should inspection software handle missing manuals?
Inspection software should allow the inspector to document whether manufacturer instructions were reviewed, unavailable, not provided, or could not be matched because the model was not verified.
Why is generic fireplace reporting risky for factory-built systems?
Generic reporting can make a factory-built fireplace appear simpler than it is. Without model-specific documentation, the report may fail to preserve listing-label status, manual availability, component compatibility, accessory concerns, and inspection Limitations.
Alt text
Factory-built fireplace inspection documentation workflow with tablet report, manual pages, label documentation, and internal camera inspection evidence.