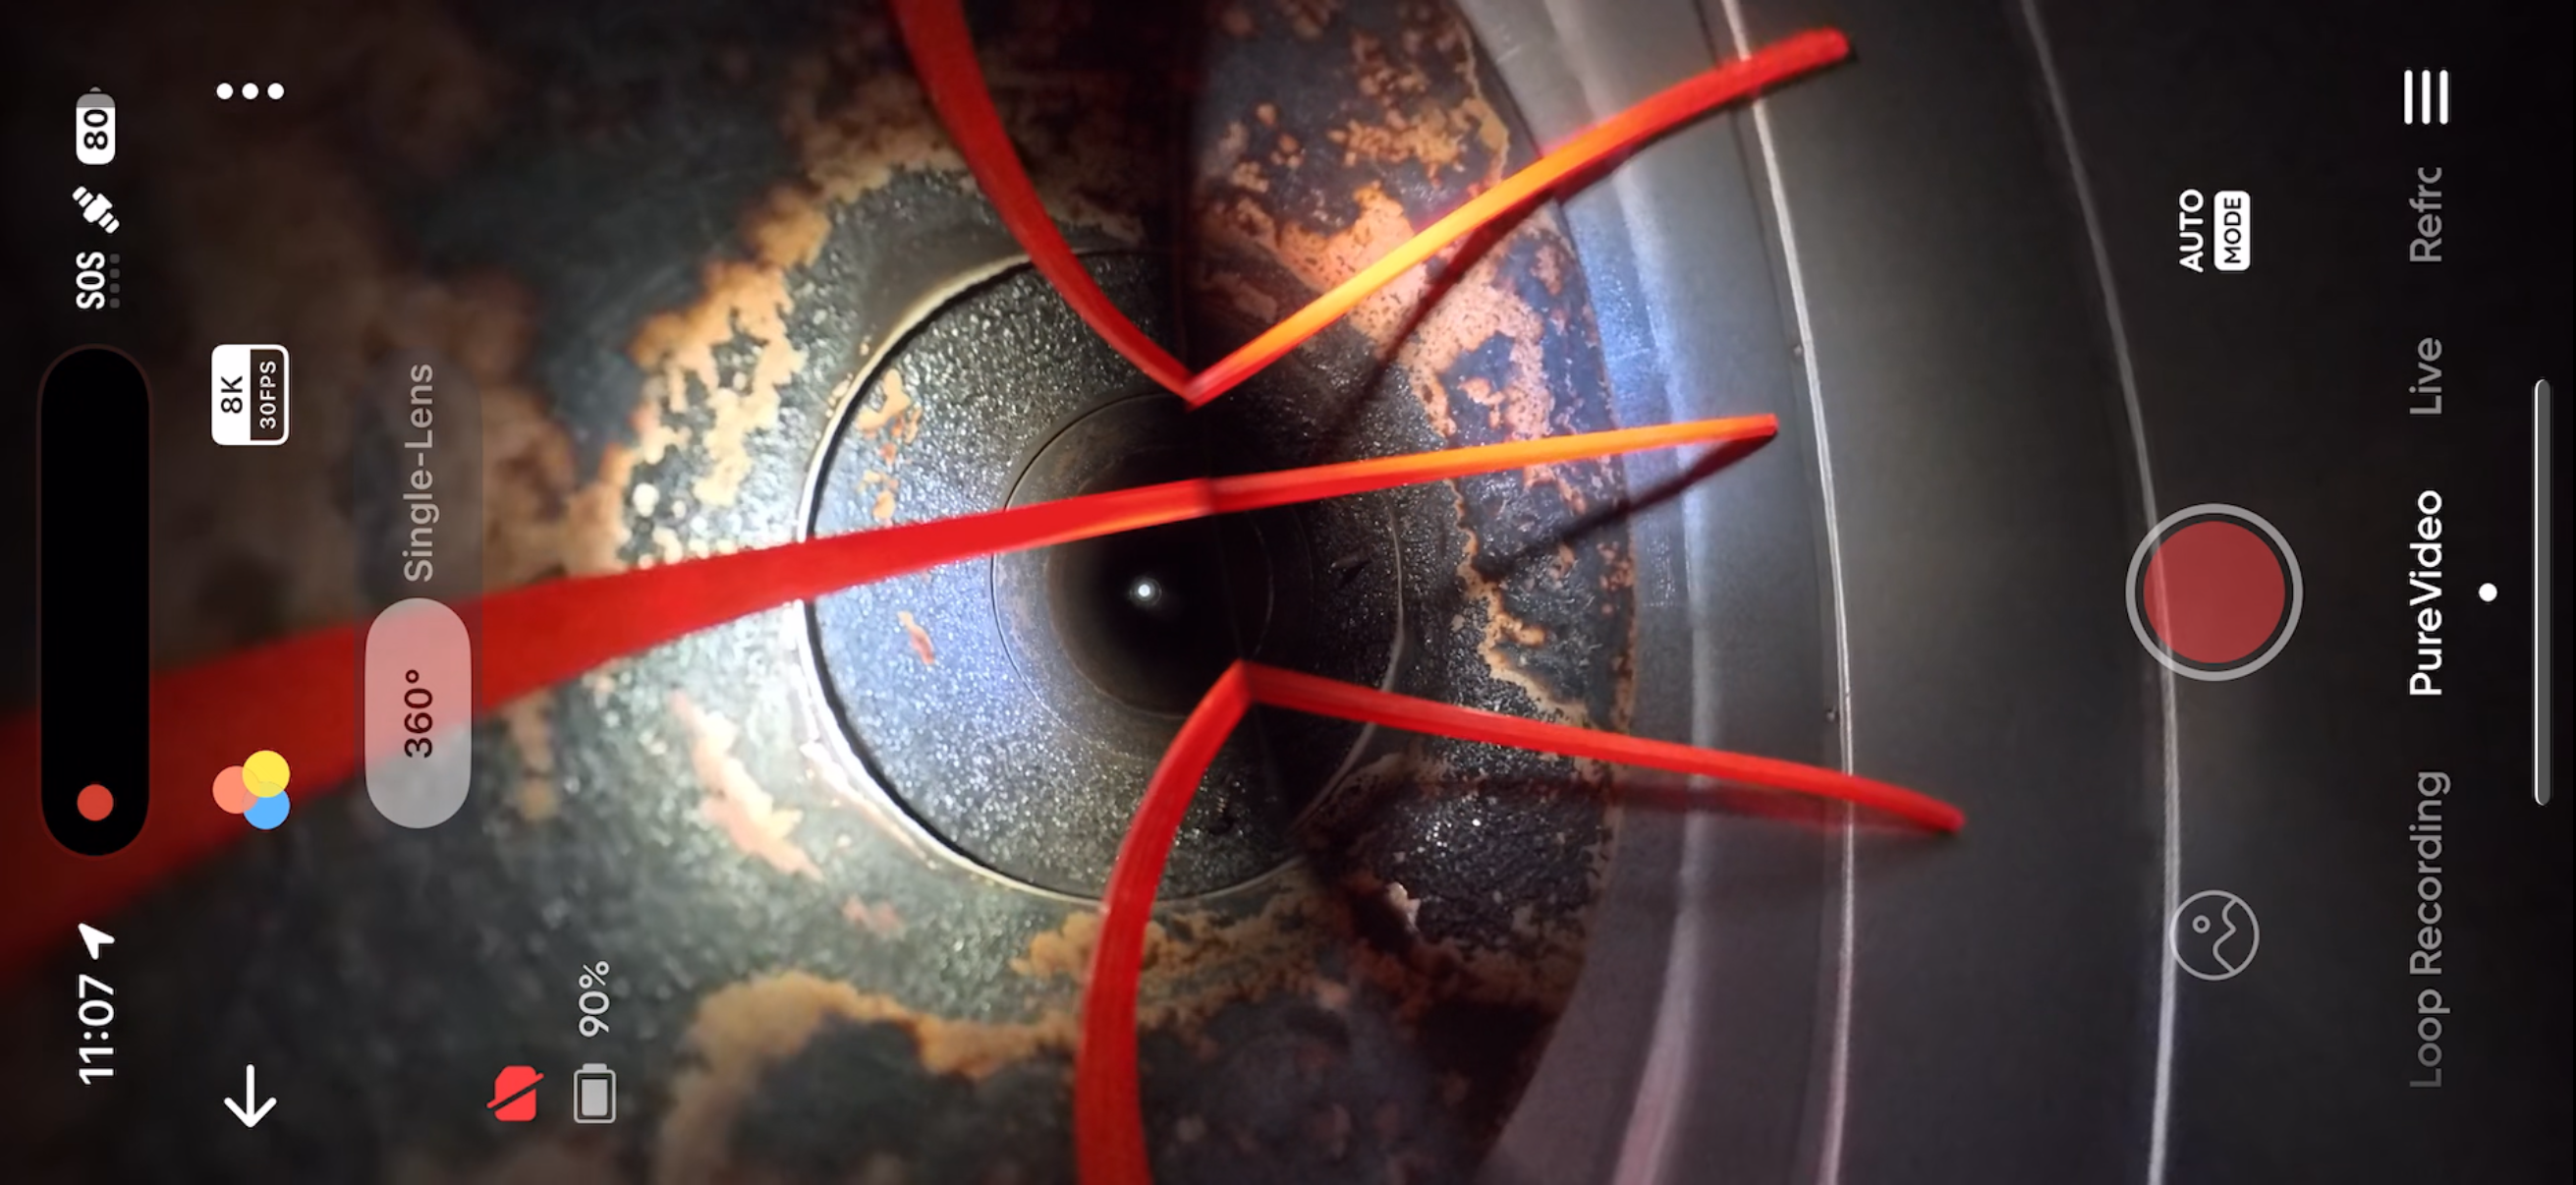
Posted on

360° Chimney Inspection Camera vs Borescope: What Professionals Should Know


A cheap borescope can be useful around a fireplace, appliance cavity, smoke shelf, cleanout, or other tight-access area. But that does not make it the best primary tool for professional chimney inspection documentation.

For chimney, fireplace, hearth, and venting professionals, the real question is not simply:

“Can this camera see inside the chimney?”

The better question is:

“Can this camera help me produce clear, reviewable, defensible visual evidence for the inspection report?”

That is where the difference between a small borescope and a purpose-built 360° chimney inspection camera workflow becomes important.

The Short Answer

A borescope is a useful utility camera, however it is not specifically suited to run up through a chimney and capture all the necessary data.

A 360° chimney inspection camera is usually a better fit when the goal is broad flue-wall documentation, later report review, and consistent visual evidence.

That does not mean a 360° camera replaces every other inspection tool. It also does not mean a borescope has no place in the truck, or during an inspection. The two tools serve different purposes.

For most professional chimney documentation workflows:

NeedBetter fit
Quick look inside a small cavity or other inaccessible areaBorescope
Openings too small for larger inspection cameras or phones to fit into or focus onBorescope
Broad interior flue documentation, smoke chamber, smoke shelf, chase interiors with large enough access points360° chimney inspection camera
Level II-style chimney documentation360° camera or other suitable image-scanning system
Controlled live directional viewing360° camera or pan-and-tilt chimney camera
Report evidence that can be reviewed later360° camera workflow

The borescope is a quick-access tool. The 360° chimney camera is a documentation tool.

What a Borescope Does Well

A borescope, endoscope, or small inspection camera can be valuable in chimney and fireplace work when access is limited and the inspection target is narrow.

Examples include:

  • looking between gaps/cracks in facing materials or components;
  • checking behind or around appliance components;
  • looking behind electronics or entering concealed areas using wiring boxes/outlets/etc;
  • checking a confined area before disassembly;
  • documenting a specific visible concern at close range.

Borescopes are inexpensive, portable, and easy to keep in a service vehicle. Many include their own lights, flexible leads, and phone or monitor connections. For basic troubleshooting and quick verification, they can be useful.

The problem starts when the borescope is treated as the main chimney inspection camera.

Where Borescopes Fall Short in Chimney Inspection Work

Inside a chimney flue, the camera geometry matters.

A small borescope usually points in one direction. If it is dropped or pushed through a flue, the operator may not know exactly which wall surface is being viewed. The camera may rub against one side, twist during movement, or miss portions of the liner. Lighting may be uneven. The image may be unstable. The resulting footage may be difficult to interpret later.

Common limitations include:

  • narrow field of view;
  • poor orientation control;
  • unstable footage;
  • lack of perspective;
  • limited ability to capture all sides of the flue;
  • inconsistent/insufficient lighting;
  • limited effective range;
  • difficulty documenting vertical position;
  • weak reporting workflow;
  • limited value for later review by the client, office, supervisor, or third party.

For a quick look, those limitations may be acceptable. For a professional inspection report, they can become a problem.

A report is only as strong as the evidence behind it. If the camera angle is inconsistent, if the footage only shows one wall, or if the image cannot be tied back to a clear inspection location, the camera has not solved the documentation problem.

What a 360° Chimney Inspection Camera Does Differently

A 360° chimney inspection camera captures a much broader visual field than a single-direction borescope. Instead of trying to point the camera perfectly at every wall surface, the camera captures the surrounding flue area for later review.

That changes the workflow.

The inspector can move the camera through the chimney while collecting broader visual evidence. Afterward, the footage can be reviewed to identify areas that need still images, report notes, recommendations, or limitations.

Key advantages include:

  • broad flue-wall capture;
  • less dependence on perfect camera aiming;
  • better reviewability after the inspection;
  • stronger visual documentation for the report;
  • practical use from the top down or bottom up depending on access and rod setup;
  • camera-platform upgradeability when using modern action-camera systems;
  • lower cost than many dedicated pan-and-tilt CCTV systems.

A 360° camera does not automatically make the inspection good. The housing, centering, lighting, rod control, camera settings, operator technique, and report workflow still matter. But when those pieces work together, a 360° chimney camera can be one of the most practical documentation tools available to a chimney or fireplace inspection business.

Level II Documentation: The Issue Is Evidence, Not Just Visibility

A Level II chimney inspection is not just a casual look into the firebox.

The inspection scope is broader. It includes accessible portions of the chimney and connected appliance, and the chimney interior must be examined using image scanning equipment or an equivalent or more advanced viewing method where needed to observe those areas.

That matters for camera selection.

The camera should help the inspector document:

  • what was visible;
  • what was not visible;
  • what portions of the system were accessed;
  • what limitations affected the inspection;
  • whether the flue interior showed visible cracks, gaps, offsets, deterioration, blockage, unused openings, or other concerns;
  • which findings were significant enough to include in the report.

For that purpose, a borescope may be too limited as the primary tool. It has its place and may help with a specific detail or getting into an otherwise inaccessible area, but it usually does not provide the same broad documentation value as a 360° chimney camera system or a dedicated chimney inspection camera system.

360° Chimney Camera vs Borescope Comparison

CategoryBorescope / endoscope360° chimney inspection camera
Best useQuick checks in small areasBroad flue documentation
Field of viewNarrowFull 360° capture
OrientationCan be difficult to controlLess dependent on perfect aiming
Documentation valueLimited for full flue reviewStronger for later review
CostUsually lowerUsually higher than a borescope but lower than many CCTV systems
Report workflowOften weakBetter suited to photo/video evidence workflows
Level II-style useSupplemental toolBetter primary documentation option
Upgrade pathUsually replace the whole unitCamera can often be replaced or upgraded separately
Best buyerHomeowner, technician, utility useChimney/fireplace professional, home inspector adding chimney services

When a Borescope Is the Right Tool

A borescope still belongs in the inspection toolkit.

Use it when the target is small, close, specific, or otherwise inaccessible. For example, a borescope can help document conditions between components/materials where separation has occurred, inside or behind damaged areas, through cracks/gaps, inside wall cavities, stuck damper area, or behind specific obstruction.

It is especially useful when:

  • the area is too small for a larger camera housing;
  • the inspection target is near the access point;
  • the question is narrow;
  • the image does not need to represent the entire flue interior;
  • the borescope is supplementing a broader inspection method.

The key is to treat the borescope as a supplemental tool, not as the entire chimney documentation system.

When a 360° Chimney Inspection Camera Is the Better Tool

A 360° chimney camera is the better fit when the goal is to document the chimney interior in a way that can be reviewed later and used in a professional report.

It is especially useful when:

  • the inspection involves a Level II-style workflow;
  • the company needs consistent photo/video evidence;
  • the inspector wants to capture more of the flue wall surface;
  • the office or report writer may review the footage later;
  • the client needs visual support for recommendations;
  • the company wants a portable alternative to a higher-cost dedicated CCTV system;
  • the inspector already uses or wants to use action-camera platforms such as GoPro or Insta360.

For many companies, this is the practical middle ground between a cheap borescope and a full dedicated pan-and-tilt inspection system.

Where Pan-and-Tilt Chimney Cameras Still Fit

A 360° camera is not the only professional option.

Traditional pan-and-tilt chimney cameras can be excellent tools. They usually provide controlled live viewing, directional camera movement, a monitor, cable or push-rod system, lighting control, and recording. For inspectors who want live directional control inside the flue, a pan-and-tilt camera may be the right tool.

The tradeoff is usually cost, equipment bulk, and workflow. Dedicated systems can be more expensive and may not integrate as easily with modern action-camera ecosystems or cloud/reporting workflows.

The practical question is not which camera is universally best. The practical question is which camera best supports the type of inspection work your company performs.

Buying Criteria for Professional Chimney Camera Documentation

Before buying a chimney inspection camera, evaluate the system against the workflow you actually need.

Ask:

  1. Can it document the full area I need to evaluate?
    A narrow view may be enough for a small cavity, but not for broad flue documentation.
  2. Can I review the evidence later?
    The camera should support report writing, not just live viewing.
  3. Can the footage be converted into useful report photos quickly and easily?
    If the footage cannot support clear still images, it may not help the report.
  4. Can the camera move through the chimney without constant snagging?
    Housing design, centering, rod control, and durability matter.
  5. Can I document limitations clearly?
    If offsets, debris, access restrictions, or geometry prevent complete viewing, the workflow should make that limitation easy to record.
  6. Can the system grow with my company?
    A camera-platform-based system may allow future camera upgrades without replacing every part of the inspection setup.
  7. Does it fit the business model?
    A company doing occasional visual checks may not need the same system as a company selling documented Level II chimney inspections.

How InspectionFire Fits This Workflow

InspectionFire camera housings and kits are built for chimney, fireplace, hearth, and venting professionals who need practical visual documentation inside real inspection environments.

The purpose is not merely to protect a camera. The purpose is to help the camera move through chimneys and vents in a way that supports usable evidence.

For inspectors using compatible GoPro or Insta360 platforms, InspectionFire systems are designed to support:

  • 360° chimney documentation;
  • single-lens inspection workflows;
  • tight-space and offset navigation;
  • low-light inspection needs;
  • report evidence collection;
  • professional inspection workflows.

A 360° action camera by itself is not a chimney inspection system. The camera needs the right housing, rod setup, lighting approach, inspection technique, and reporting process. InspectionFire focuses on that professional workflow.

Bottom Line

A borescope can be useful. It is not automatically a professional chimney inspection documentation system.

For broad chimney flue review, Level II-style documentation, and report evidence, a 360° chimney inspection camera workflow is usually the stronger choice. It gives the inspector more visual coverage, better reviewability, and a more practical path from field evidence to final report.

Use the borescope for tight, specific, close-range questions.

Use the 360° chimney camera when the inspection requires broader documentation.

And when the report needs to stand on the quality of the evidence, choose the camera workflow accordingly.

FAQ

Is a borescope good enough for a chimney inspection?

A borescope can be useful for quick checks and small-access areas, but it is usually not the best primary tool for professional chimney flue documentation. Its narrow view, orientation issues, and limited reporting workflow can make it weak for broad chimney interior review.

Is a 360° camera better than a borescope for Level II chimney inspections?

For documentation-focused inspections, a 360° chimney camera is generally a better fit than a borescope because it captures more of the flue wall surface and supports later review. A borescope may still be useful as a supplemental tool.

Can a GoPro or Insta360 be used for chimney inspections?

Yes, compatible action cameras can be used as part of a chimney inspection workflow when paired with an appropriate housing, rod setup, lighting strategy, and report process. The camera alone is not enough; the inspection system and workflow matter.

Do I still need a pan-and-tilt chimney camera?

Some companies do. Pan-and-tilt systems are useful when live directional control is the priority. A 360° action-camera workflow is often more practical when broad capture, portability, upgradeability, and later report review are the main priorities.

What should chimney camera footage show?

Useful chimney camera footage should help document accessible interior flue conditions, visible liner surfaces, joints, cracks, gaps, offsets, blockages, deterioration, unused openings, or other relevant conditions. It should also support clear limitations when portions of the system cannot be observed.

What is the biggest mistake when buying a chimney inspection camera?

The biggest mistake is buying only for image capture instead of documentation workflow. A camera must help the inspector produce useful, reviewable evidence for the report. Field of view, movement through the chimney, lighting, camera protection, and reporting process all matter.

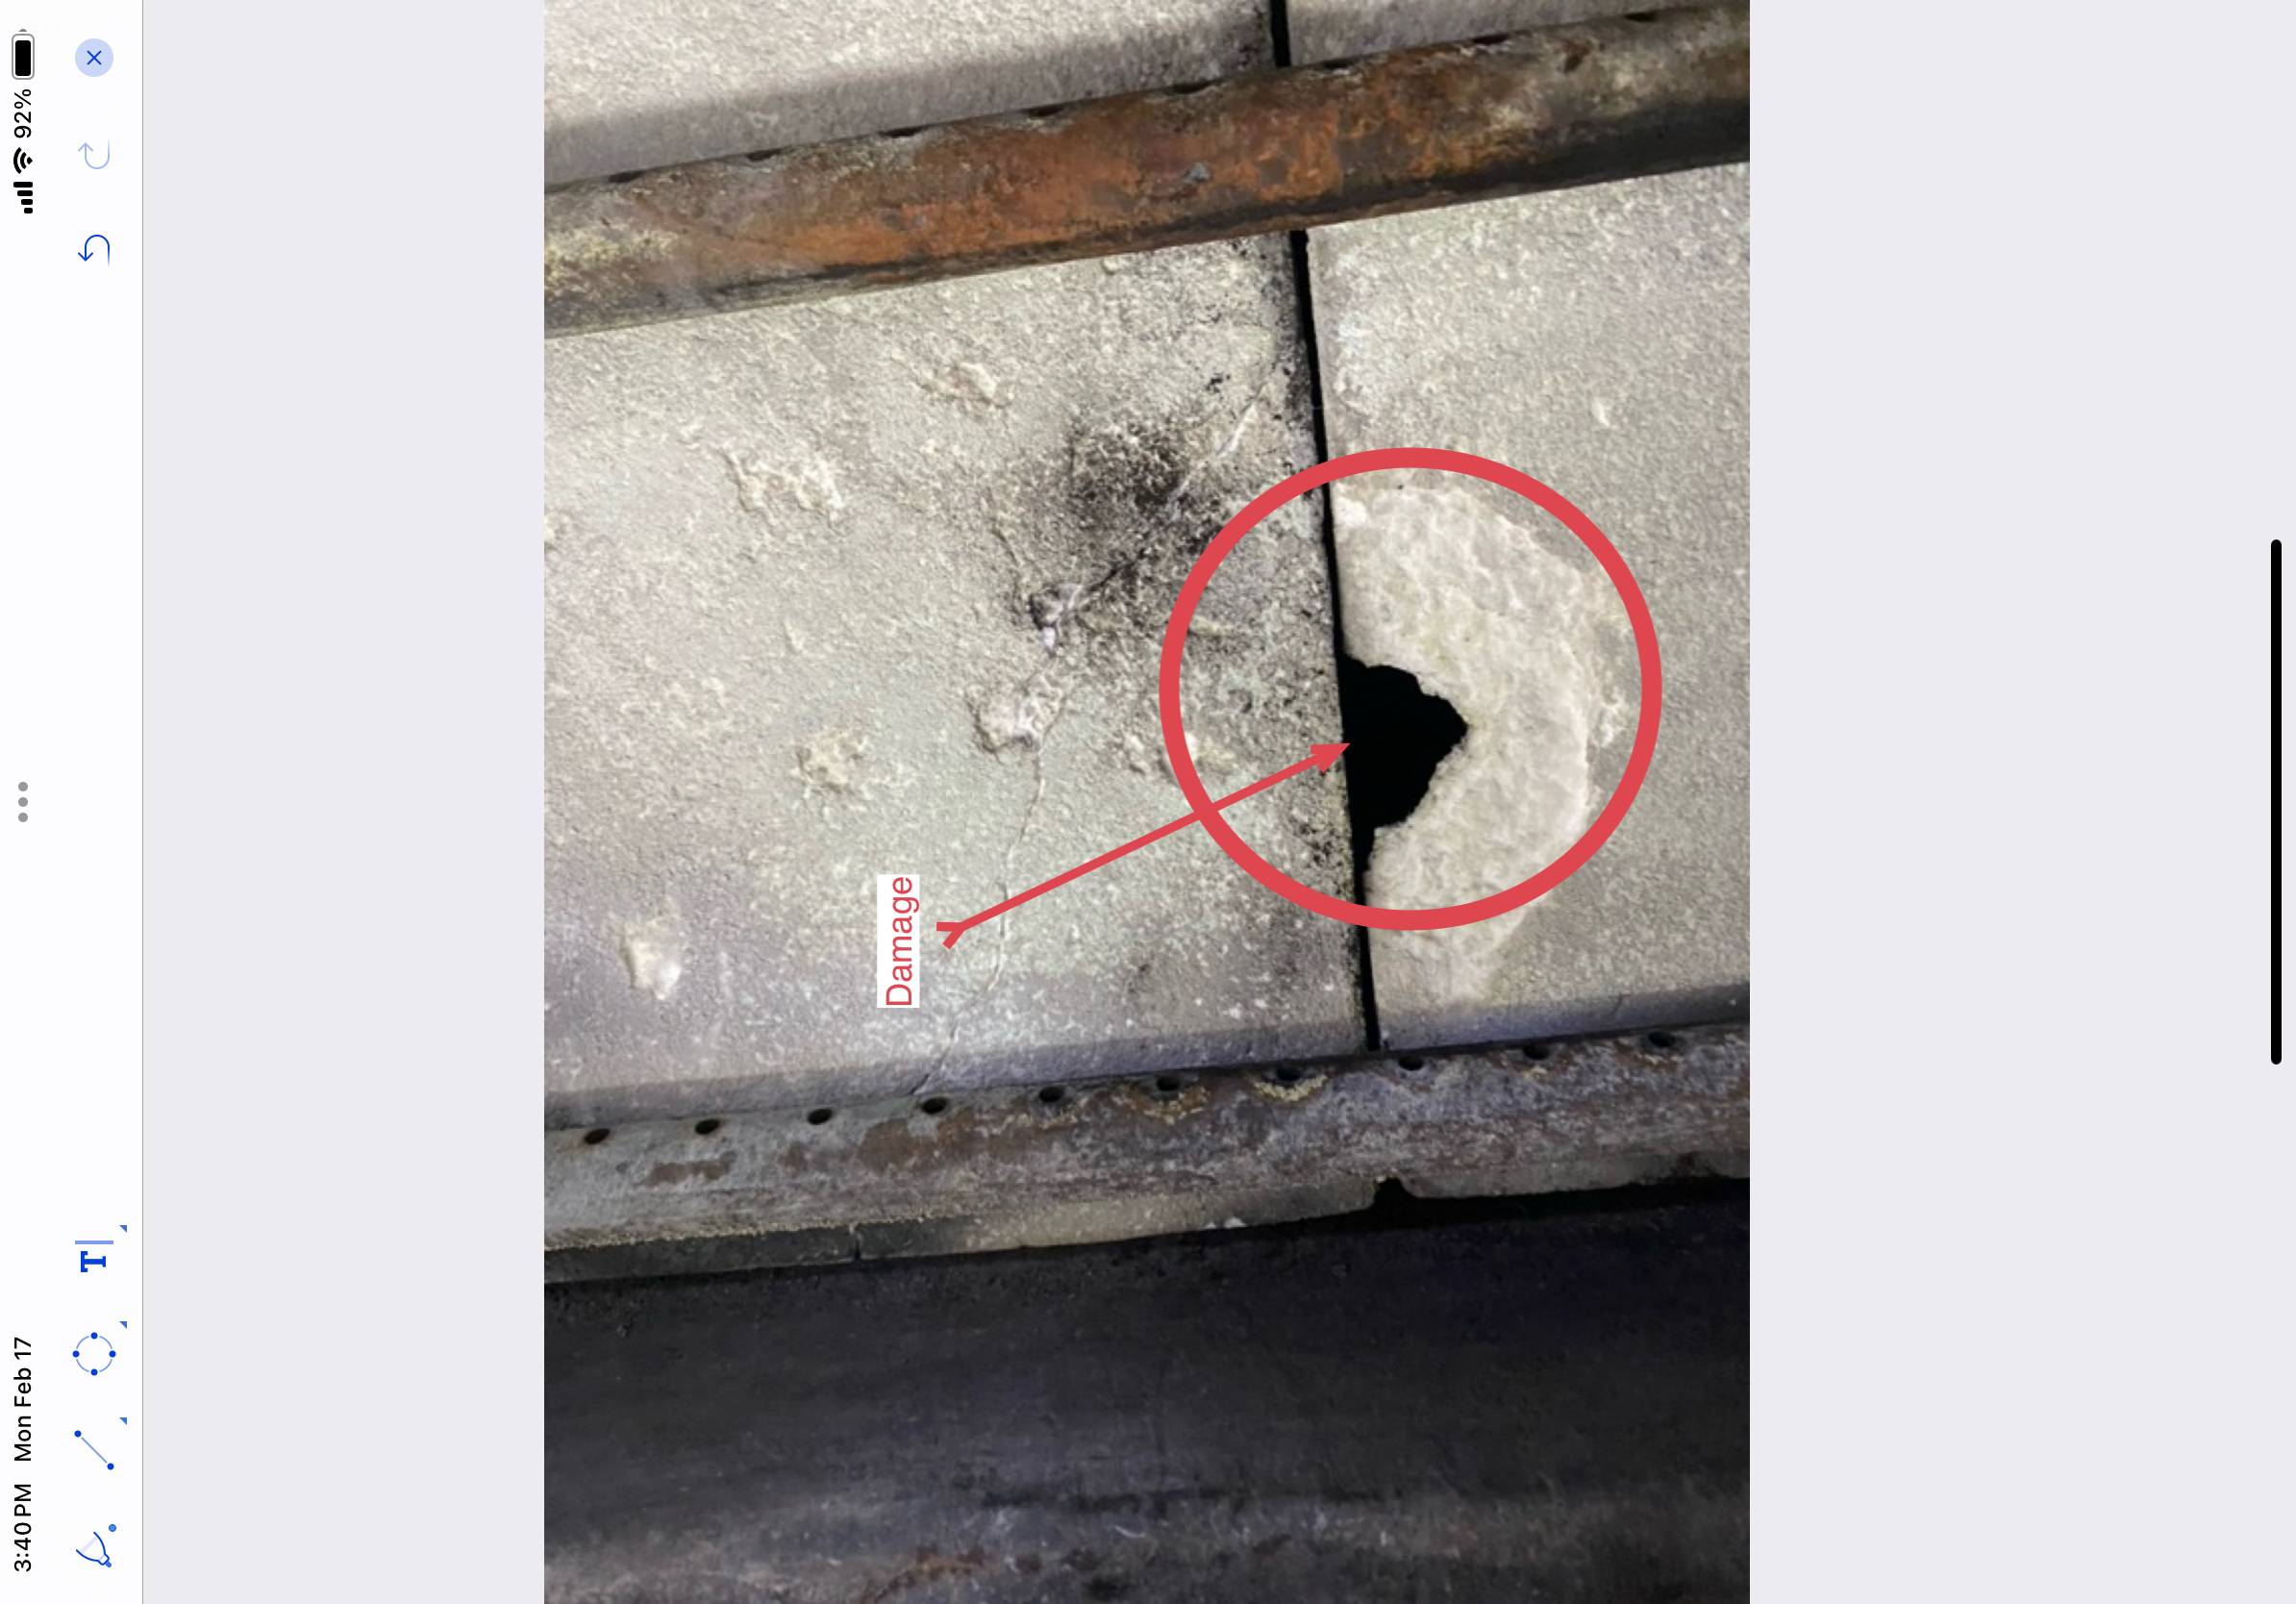
Posted on

Home Inspector Chimney Referral Checklist: When to Recommend a Level II Inspection


A general home inspection can identify visible concerns around a fireplace, chimney, or venting system. But a general home inspection is not the same thing as a Level II chimney inspection.

That distinction matters.

Many fireplace and chimney defects are hidden inside the flue, smoke chamber, chase, attic, crawlspace, appliance connection, or concealed clearance areas. A home inspector may be able to see the firebox, hearth, damper, exterior chimney, visible roof penetration, and readily accessible portions of the system. But that does not mean the inspector has verified whether the chimney is suitable for continued use.

For that reason, a clear chimney referral checklist can protect the client, improve the inspection report, and create a better handoff to a chimney or fireplace specialist.

This article explains when a home inspector should recommend a Level II chimney inspection, what conditions should trigger a referral, and how the referral should be documented.


The Scope Problem: Home Inspection vs. Chimney Inspection

A home inspection is generally visual and limited to readily accessible systems and components. The home inspector is not usually dismantling appliances, scanning the chimney interior, verifying every manufacturer instruction, determining all clearance compliance, or performing a full NFPA 211-style chimney inspection unless that service is specifically included, the inspector is trained, and the scope has been clearly defined.

A fireplace or chimney may appear acceptable from the room and still have serious concealed concerns.

Examples include:

  • cracked or separated flue liners;
  • missing mortar joints;
  • damaged smoke chamber surfaces;
  • improperly installed liners;
  • hidden clearance issues;
  • combustible framing too close to masonry;
  • disconnected or abandoned thimbles;
  • unlisted or modified appliance installations;
  • inaccessible chase conditions;
  • improper venting connections;
  • corrosion or deterioration inside a flue;
  • prior chimney fire evidence not visible from the room.

A home inspector’s report should not imply that these concealed conditions were evaluated if they were not.

The better approach is to document visible observations, state the limitation clearly, and recommend further evaluation when conditions justify it.


What a Home Inspector Can Usually Observe

A home inspector may be able to document readily visible conditions such as:

  • fireplace type;
  • hearth and hearth extension condition;
  • visible firebox damage;
  • visible chamber deterioration;
  • damper presence and basic manual operation;
  • cleanout door presence and condition;
  • visible chimney exterior from the ground, roof edge, or accessible vantage point;
  • visible chimney cap, crown, chase cover, spark arrestor, or termination concerns;
  • staining, water entry, corrosion, efflorescence, spalling, or cracked masonry;
  • visible vent connector concerns;
  • missing smoke or carbon monoxide alarms where required by the inspection standard or local practice.

This visible documentation is valuable. It helps the client understand what was observed and gives the chimney specialist useful context.

But the report should not overstate the inspection.

A statement such as “chimney appears functional” may be too broad if the flue interior, accessible attic/crawlspace areas, appliance connection, and concealed clearances were not evaluated.

A more defensible statement is:

“Readily visible portions of the fireplace and chimney were observed as part of the general home inspection. The interior of the flue and concealed portions of the chimney system were not fully evaluated. A Level II chimney inspection by a qualified chimney/fireplace professional is recommended before use or before the end of the inspection contingency period.”


What a Home Inspector Usually Cannot Verify

The following items are commonly outside the practical scope of a general home inspection unless the inspector is specifically performing a chimney inspection service:

  • complete internal flue condition;
  • full smoke chamber condition;
  • hidden liner cracks or gaps;
  • appliance listing and installation compliance;
  • suitability for continued use;
  • chimney sizing for the connected appliance;
  • complete vent connector compliance;
  • hidden combustible clearance conditions;
  • concealed support conditions;
  • prior chimney fire damage;
  • full manufacturer-instruction compliance;
  • whether all flues in a chimney serve only the intended appliances;
  • whether abandoned openings are properly sealed;
  • whether an insert, stove, liner, or gas appliance was installed as a listed system.

These are not minor distinctions. They affect safety, liability, client expectations, and repair decisions.

The home inspector does not need to solve every chimney problem. The home inspector needs to recognize when the visible conditions, transaction context, or scope limitations justify referral.


When to Recommend a Level II Chimney Inspection

A Level II chimney inspection is commonly recommended when the conditions of use are changing, when a property is being sold, when a new appliance or liner is being installed, or when an event may have damaged the chimney or venting system.

For home inspectors, the most common trigger is simple:

The property is being sold, and the fireplace or chimney has not received a documented Level II inspection by a qualified chimney professional.

That alone is enough to justify a recommendation in many real estate workflows.

Additional referral triggers include:

  • visible damage to the fireplace, chimney, hearth, firebox, smoke chamber, or exterior masonry;
  • evidence of water damage;
  • staining, rust, corrosion, or deterioration;
  • missing, damaged, or questionable chimney cap, crown, or chase cover;
  • damaged or nonfunctional damper;
  • smoke staining or evidence of poor draft;
  • reported performance problems;
  • prior chimney fire, lightning strike, storm damage, impact, or seismic event;
  • appliance change, fuel change, liner change, or relining;
  • inserted stove or fireplace insert with limited visible installation details;
  • factory-built fireplace with missing label, corrosion, damage, or unknown replacement parts;
  • visible clearance concerns;
  • concealed or inaccessible areas that affect the inspection conclusion;
  • any system the client intends to use and whose internal condition has not been verified.

A Level II referral does not need to accuse the system of being unsafe. It can simply state that the system was not fully evaluated and that further inspection is needed before use or purchase reliance.


Home Inspector Chimney Referral Checklist

Use this checklist as a practical decision aid.

Refer for Level II inspection if any of the following apply:

Transaction or use-condition triggers

  • Property is being sold or transferred.
  • Client intends to use the fireplace or appliance after purchase.
  • Appliance, fuel type, liner, or venting configuration has changed.
  • A new appliance or liner is being considered.
  • Prior inspection history is unknown.
  • Seller cannot provide current chimney inspection documentation.

Visible damage triggers

  • Cracked firebox panels, masonry, refractory, or mortar joints.
  • Damaged hearth or hearth extension.
  • Deteriorated smoke chamber visible from the firebox.
  • Rusted damper, firebox, connector, or factory-built fireplace components.
  • Spalling brick, missing mortar, damaged crown, or failing chase cover.
  • Water staining, efflorescence, leaks, or moisture-related deterioration.
  • Displaced cap, missing cap, animal entry evidence, or debris.

Operation or performance triggers

  • Smoke rollout or staining.
  • Odor complaints.
  • Poor draft reports.
  • Creosote glaze or heavy deposits visible from accessible areas.
  • Evidence of overheating.
  • Sooting around a gas fireplace or appliance.
  • Carbon monoxide concern.
  • Prior chimney fire or suspected chimney fire.

Installation or configuration triggers

  • Fireplace insert or stove installed into a fireplace.
  • Unknown liner type or liner condition.
  • Factory-built fireplace label missing or unreadable.
  • Visible combustible material near appliance or chimney components.
  • Unusual connector routing.
  • Shared flue concerns.
  • Abandoned openings or thimbles.
  • Appliance appears modified, incomplete, or not installed according to visible listing details.

Access and limitation triggers

  • Flue interior not visible.
  • Roof access unsafe or limited.
  • Attic/crawlspace areas inaccessible.
  • Insert, stove, or appliance blocks view of key components.
  • Snow, ice, height, steep roof, or site conditions prevent evaluation.
  • Firebox contents, storage, furniture, or occupant limitations restrict inspection.

If several of these conditions are present, the report should not merely say “monitor.” It should recommend further evaluation by a qualified chimney or fireplace professional.


Why Real Estate Transactions Deserve Special Attention

Real estate inspections create a compressed decision window. Buyers, sellers, agents, and contractors may all rely on the home inspection report to decide whether more specialized evaluation is needed before closing.

That makes chimney referral language important.

A general home inspection report should not create false assurance. If the system was not fully inspected internally, that should be clear.

A strong referral statement helps the client act before the inspection objection deadline, repair negotiation, closing date, or occupancy decision.

Example:

“Because this property is being transferred and the fireplace/chimney system was not evaluated with Level II chimney inspection procedures or internal image scanning as part of this general home inspection, further evaluation by a qualified chimney/fireplace specialist is recommended before closing and before use.”

This language is direct, practical, and tied to the transaction context.


Camera Documentation and Image Scanning

A Level II chimney inspection is not just a longer visual look from the fireplace opening.

A Level II workflow typically includes internal examination of the chimney or flue using image scanning equipment or comparable means. The goal is to observe the internal surfaces and joints of the flue and document conditions that may not be visible from the firebox, appliance opening, cleanout, or chimney top.

For home inspectors, this creates two possible business models:

  1. Referral model: The home inspector does not perform Level II chimney inspections but consistently refers the client to a qualified chimney/fireplace specialist when the checklist supports referral.
  2. Added-service model: The home inspector obtains the proper training, equipment, software, procedure, and documentation workflow to offer chimney inspection services as a separate service with a clearly defined scope.

Both models can be legitimate when handled correctly.

The problem is the middle ground: implying a chimney has been fully inspected when it has not.

If the inspector does not scan the flue, does not inspect the accessible attic/crawlspace portions of the chimney, does not verify appliance installation requirements, and does not document Level II scope and limitations, the report should not be presented as a Level II chimney inspection.


Report Language Examples for Home Inspectors

The right language depends on the inspection agreement, state requirements, SOP, and company policy. These examples are starting points, not legal advice.

Basic limitation language

“Inspection of the fireplace and chimney was limited to readily visible and accessible portions. The interior of the flue, concealed portions of the chimney, appliance listing requirements, and complete suitability for use were not determined as part of this general home inspection.”

Real estate referral language

“Because this property is being sold and the fireplace/chimney system has not been documented by a current Level II chimney inspection, further evaluation by a qualified chimney/fireplace professional is recommended before closing and before use.”

Visible damage referral language

“Visible damage/deterioration was observed at the fireplace/chimney system. Because the full extent of the condition cannot be determined from readily visible areas, a Level II chimney inspection by a qualified chimney/fireplace professional is recommended before use.”

Insert or stove language

“A fireplace insert/stove is installed, limiting visibility of the original fireplace, smoke chamber, flue, and installation details. A Level II inspection by a qualified chimney/fireplace professional is recommended to evaluate the system, liner, appliance connection, and suitability for continued use.”

Unsafe or inaccessible roof language

“Roof access was not performed due to safety/access limitations. Visible portions of the chimney were observed from accessible areas only. Further evaluation by a qualified chimney/fireplace professional is recommended, including accessible exterior, interior, and flue evaluation.”

Factory-built fireplace language

“The fireplace appears to be a factory-built system. Readily visible portions were observed, but the complete listing, installation, concealed components, chimney system, and suitability for continued use were not verified. Further evaluation by a qualified fireplace/chimney professional is recommended before use.”


What the Chimney Specialist Needs From the Home Inspector

A referral becomes more useful when the home inspector documents the right context.

Include:

  • system location;
  • fireplace or appliance type;
  • visible concerns;
  • access limitations;
  • client or transaction deadline;
  • whether the system appeared active, abandoned, modified, or unused;
  • photos of visible conditions;
  • whether roof, attic, crawlspace, or mechanical areas were accessed;
  • clear statement that the flue interior was not fully evaluated if no image scanning was performed.

This helps the chimney specialist understand why the referral was made and what needs to be evaluated.

It also helps the client understand that the recommendation is not generic. It is tied to inspection scope, observed conditions, and risk.


How InspectionFire Supports This Workflow

InspectionFire is built for chimney, fireplace, venting, and home inspection professionals who need more than a generic checklist.

For home inspectors who refer chimney work, InspectionFire content and workflows can help clarify the difference between visible home inspection observations and specialized chimney documentation.

For inspectors adding chimney inspection services, InspectionFire software supports the workflow needed to document:

  • inspection level;
  • system type;
  • appliance type;
  • fuel type;
  • accessible areas;
  • limitations;
  • measurements;
  • photo evidence;
  • camera findings;
  • observations;
  • recommendations;
  • professional PDF report output.

When paired with appropriate chimney inspection camera equipment, the software helps move the inspection from field observations to organized report documentation.

The goal is not to replace training or professional judgment. The goal is to make the documentation process stronger, clearer, and more consistent.


A Referral Is Not a Failure

Some home inspectors hesitate to recommend further chimney evaluation because they do not want to appear incomplete.

That is the wrong frame.

A clear referral is part of a professional inspection process. It tells the client what was observed, what was not verified, and what should happen next.

The real risk is not making the referral when the scope or visible conditions call for one.

A well-written chimney referral protects the client from false assurance, protects the inspector from overstatement, and gives the chimney professional a clean path to complete the next level of evaluation.


Bottom Line

A home inspector does not need to perform a Level II chimney inspection on every home.

But the home inspector does need to recognize when the fireplace or chimney system deserves specialized evaluation.

Use a referral checklist when:

  • the property is being sold;
  • the client intends to use the fireplace;
  • the flue interior was not evaluated;
  • visible damage or deterioration is present;
  • access was limited;
  • the system has been modified;
  • the appliance, liner, or installation details cannot be verified;
  • prior inspection documentation is missing.

Then document the limitation clearly and recommend a qualified chimney/fireplace professional.

That is the difference between a vague disclaimer and a useful professional recommendation.


FAQ

Should home inspectors recommend a Level II chimney inspection?

Yes, when the inspection context or visible conditions justify it. Common triggers include property transfer, visible fireplace or chimney damage, unknown inspection history, limited flue visibility, appliance changes, suspected chimney fire, water damage, or installation concerns.

Can a home inspector inspect a fireplace?

A home inspector can usually inspect readily visible and accessible portions of fireplaces and chimneys within the limits of the inspection standard and agreement. That is different from a Level II chimney inspection, which involves a broader chimney-specific scope and internal image scanning or comparable means.

Is a home inspector required to inspect the flue?

A general home inspection standard may not require the inspector to inspect the flue or interior chimney system. Inspectors should follow their applicable SOP, state rules, agreement, and company policy.

What should a home inspector say when referring a chimney?

The report should identify what was visible, what was limited, why further evaluation is recommended, and when the client should obtain it. For real estate inspections, the report should often recommend evaluation before closing and before use.

Is a camera required for a Level II chimney inspection?

A Level II chimney inspection shall includes internal examination of the chimney using image scanning equipment or comparable means per NFPA 211 – the standard for chimney inspections. If the interior cannot be scanned because of access, size, offsets, obstruction, or configuration, that limitation should be documented.

Can home inspectors add Level II chimney inspections as an ancillary service?

Yes, but only with appropriate training, equipment, scope language, insurance consideration, and reporting workflow. It should be offered as a clearly defined service, not implied as part of a basic visual home inspection unless that is actually the agreed scope.

What is the safest referral language?

The safest language is specific, limited, and actionable. Avoid saying the chimney is safe or unsafe unless the evidence supports that conclusion. A better approach is to state that the system was not fully evaluated and that a Level II inspection by a qualified chimney/fireplace professional is recommended before use or closing.


Join Us: July 2nd, 2026 @ 3-4pm MST

to see the newest updates to the InspectionFire chimney inspection workflow.

Posted on

What Level II Chimney Inspection Software Should Document Before It Generates a Report

A Level II chimney inspection report is not just a form. It is a professional record of what was inspected, what was accessible, what was observed, what could not be verified, and what should happen next.

That distinction matters.

A chimney company may use the report to explain safety concerns to a homeowner. A home inspector may use it to support a referral to a chimney or fireplace specialist. A real estate client may use it during a transaction. An insurance adjuster, attorney, property manager, or future contractor may review it months or years later.

That means Level II chimney inspection software should do more than help an inspector check boxes and export a PDF. It should help the inspector build a clear, organized, evidence-based record.

A Level II Report Should Begin With the Scope

The first job of a good inspection report is to define the inspection.

A Level II chimney inspection is typically associated with changed conditions, property transfer, relining, appliance change, suspected damage, fire events, weather events, seismic events, operating malfunctions, or situations where a Level I inspection is not enough to determine serviceability.

Software should help the inspector clearly record why the inspection was performed.

Examples include:

  • Property sale or transfer
  • Appliance replacement or fuel change
  • Prior chimney fire or suspected overheating event
  • Relining or liner replacement evaluation
  • Reported performance problem
  • Storm, impact, water, or seismic concern
  • Annual inspection upgraded because conditions could not be adequately evaluated at Level I

The report should not leave this context vague. A sentence such as “chimney inspection performed” does not tell the reader enough. A better report identifies the reason for the inspection and the system or systems included.

The Software Should Identify Each System Separately

Many properties have more than one fireplace, chimney, appliance, vent, or flue. A report becomes confusing quickly when those systems are not separated.

A professional chimney inspection app should allow the inspector to document each system as its own record, including:

  • Appliance or fireplace type
  • Fuel type
  • Chimney or vent type
  • Location in the building
  • Connected appliances
  • Flue designation
  • Exterior chimney or chase location
  • Inspection level
  • Whether the system was active, inactive, abandoned, inaccessible, or not included

This matters because recommendations should be tied to the correct system. If a house has a wood-burning masonry fireplace in the living room, a gas fireplace in the primary bedroom, and a furnace vent in the mechanical room, the report should not blur those findings into one general chimney section.

The reader should be able to understand exactly which system was inspected and which finding belongs to that system.

Access and Limitations Must Be Documented

A Level II inspection depends heavily on access. The inspector may need to evaluate accessible portions of the chimney, fireplace, appliance, connector, attic, crawlspace, basement, exterior, roof area, and internal flue surfaces.

But access is not always available.

Common limitations include:

  • Unsafe roof access
  • Snow, ice, steep pitch, fragile roofing, or unsafe ladder placement
  • Locked rooms or inaccessible attic/crawlspace entries
  • Finished wall or ceiling areas concealing portions of the system
  • Insert, stove, or appliance components that cannot be removed within the agreed scope
  • Severe offsets, obstructions, debris, or dimensions preventing complete camera travel
  • Weather conditions limiting exterior or rooftop evaluation
  • Occupant or client restrictions

Software should not treat limitations as afterthoughts. It should force the inspector to document them in the proper system section, explain why access was limited, and describe how that limitation affects the conclusions.

A report that fails to document limitations can imply that a condition was verified when it was not.

Camera Evidence Should Be Connected to the Report

For Level II work, camera documentation is not simply a marketing upgrade. The internal condition of the chimney or flue is often the part of the system that cannot be reliably evaluated from the firebox opening or chimney top alone.

Good chimney inspection software should help connect camera evidence to the written report.

At minimum, the software should support:

  • Photos or still frames from camera footage
  • Captions explaining what the image shows
  • Location references, such as upper flue, smoke chamber, offset, connector, crown area, or appliance transition
  • Direction of view when relevant
  • Notes about whether the scan was complete or limited
  • Clear identification of defects, obstructions, cracks, gaps, corrosion, missing mortar, damaged liners, improper transitions, or abandoned openings

The point is not to overwhelm the client with every image collected. The point is to preserve enough evidence to support the professional conclusion.

If the report says a liner is cracked, the photo should make the observation understandable. If the report says the scan was limited by debris, offsets, or inaccessible configuration, the report should say and show that clearly.

Measurements Belong in the Workflow, Not in the Inspector’s Memory

A strong Level II report often depends on measurements.

Software should make it easy to capture measurements in the field while the inspector is standing at the system, not later at a desk from memory.

Useful measurements may include:

  • Fireplace opening width and height
  • Hearth extension dimensions
  • Mantel and combustible trim clearances
  • Firebox depth
  • Smoke chamber height or condition notes
  • Flue dimensions
  • Chimney height above roof and relation to nearby roof surfaces
  • Connector pipe diameter, rise, run, slope, and material
  • Appliance nameplate data
  • Clearance observations in accessible attic, crawlspace, or mechanical areas

Not every inspection requires the same measurements, but the software should guide the inspector toward the measurements that matter for the system being evaluated.

Generic forms often fail here because they provide a blank field instead of a workflow. A chimney-specific system should guide the inspector based on system type, fuel type, appliance type, and inspection level.

The Report Should Separate Observations From Recommendations

Professional inspection reports are strongest when they separate what was observed from what is recommended.

An observation describes the condition.

A recommendation explains the next action.

For example:

Observation: “The clay flue liner showed visible cracking at the upper third of the flue.”

Recommendation:

  • “Do not use the fireplace until it has been repaired, relined if applicable, or issues have been bypassed with suitable appliances and venting components.“
  • “Do not use the fireplace until the system is evaluated and repaired by a qualified chimney professional. Repair options should be based on the fireplace type, flue dimensions, system configuration, and applicable manufacturer or listing requirements.”

That structure is clearer than simply writing “needs repair.”

Level II chimney inspection software should help maintain that distinction. It should support condition notes, safety implications, recommendations, and limitation language without forcing the inspector to rewrite the same paragraphs after every inspection.

The Software Should Preserve Professional Judgment

Software should not replace the inspector’s judgment. It should support it.

A good chimney inspection app gives the inspector structure, but it should still allow the professional to explain unusual configurations, limitations, conflicts, or complex conditions.

Examples include:

  • Factory-built fireplaces with missing labels
  • Obsolete appliances with unavailable parts
  • Improper field modifications
  • Chimneys serving multiple appliances
  • Prior repairs that cannot be verified
  • Inaccessible chase interiors
  • Conflicts between visible installation conditions and manufacturer instructions
  • Situations where further destructive evaluation may be required

The best reports are neither vague nor overconfident. They state what is known, what is not known, and what action is recommended based on the information available.

Generic Inspection Software Usually Misses Chimney-Specific Logic

Many general inspection apps can collect photos, generate PDFs, and create checklists. That may be enough for simple property-condition documentation, but chimney and fireplace inspections involve specialized systems.

A chimney-specific report should account for:

  • Masonry chimneys
  • Factory-built fireplaces
  • Wood stoves
  • Inserts
  • Gas fireplaces
  • Pellet appliances
  • Furnace and boiler vents
  • Connectors
  • Liners
  • Flue sizing considerations
  • Combustion air concerns
  • Hearth and clearance issues
  • Manufacturer instructions
  • Listing limitations
  • NFPA 211-informed inspection levels

A generic app may help capture data. A chimney inspection system should help organize that data into a professional report that reflects the way chimney, fireplace, and venting systems are actually inspected.

What the Final Report Should Make Clear

A Level II chimney inspection report should answer several basic questions for the reader:

  1. What system was inspected?
  2. Why was this level of inspection performed?
  3. What portions of the system were accessible?
  4. What portions were not accessible?
  5. What camera or internal inspection evidence was collected?
  6. What conditions were observed?
  7. What safety, performance, installation, or documentation concerns were identified?
  8. What recommendations were made?
  9. What should not be used until corrected or further evaluated?
  10. What remains unknown because of access, scope, or system limitations?

If the report does not answer those questions, it may still look professional, but it may not be useful when the decision becomes important.

How InspectionFire Approaches Level II Documentation

InspectionFire is built for chimney, fireplace, hearth, and venting professionals who need structured inspection workflows, field evidence capture, and professional PDF output.

The goal is not simply to make the report look better. The goal is to help the inspector capture the right information in the field and organize it in a way that is clear, consistent, and defensible.

That includes guided workflows, system-based documentation, photo and measurement capture, report language, sample Level II report structures, and tools that support chimney-specific inspection work.

When paired with proper camera equipment, the report becomes stronger because the written findings and visual evidence support each other. The camera gathers the proof. The software organizes it. The inspector applies professional judgment.

Final Thought

A Level II chimney inspection report should not be built from memory after the job. It should be built from structured field documentation, clear limitations, system-specific observations, camera evidence, measurements, and professional recommendations.

That is what chimney inspection software should support.

A PDF is only the final output. The real value is the workflow that creates it.

FAQ

What is Level II chimney inspection software?

Level II chimney inspection software is a reporting system designed to help inspectors document the scope, access, observations, camera evidence, measurements, limitations, and recommendations associated with a Level II chimney or fireplace inspection.

Does Level II chimney inspection software replace the inspector?

No. Software does not replace professional judgment, training, or field experience. It should support the inspector by organizing the workflow, preserving evidence, and producing a clearer report.

Should a Level II chimney inspection include camera documentation?

NFPA 211 requires that for a Level II inspection to be completed an internal examination of the chimney or flue using video scanning or similar means shall be performed. If a full scan cannot be completed, the reason should be documented in the report.

What should a Level II chimney inspection report include?

A strong report should identify the system, reason for the inspection, inspection level, accessible and inaccessible areas, observed conditions, photo or camera evidence, measurements where relevant, limitations, safety concerns, and recommendations.

Can InspectionFire Level II chimney inspection software document other inspection and service types?

Yes, our InspectionFire chimney inspection software is commonly used to document Level I inspections as well as standard service calls, annual service, troubleshooting, repair, installation, and replacement work. It is built so that technicians in the field can document the work they perform whatever its scope. Other software systems may or may not allow that flexibility.

Can home inspectors perform Level II chimney inspections?

Some home inspectors add chimney inspection services after obtaining appropriate training, equipment, and reporting systems. Others refer Level II chimney inspection work to chimney or fireplace specialists. Either way, the referral or report should clearly identify the inspection scope and its limitations.

Why is chimney-specific software better than a generic inspection checklist?

Generic software can document photos and notes, but chimney-specific software is better suited to system types, inspection levels, flue evidence, appliance data, manufacturer instructions, and chimney/fireplace-specific report language.

What is the difference between inspection software and camera equipment?

Camera equipment captures visual evidence inside the chimney, flue, smoke chamber, vent, or other accessible areas. Inspection software organizes the findings, photos, measurements, limitations, and recommendations into a professional report.

Should the report say a system is “NFPA compliant”?

Professional we would recommend not to say “NFPA compliant”. Use caution. A report can be NFPA 211-informed or performed with reference to NFPA 211 inspection levels, but broad “compliance” language can be misleading unless the inspection scope, applicable standard, and conclusions are stated precisely.

Join Us: July 2nd, 2026 @ 3-4pm MST

to see the newest updates to the InspectionFire chimney inspection workflow.

Posted on

The Measure of Fire

As we begin a new year, we wanted to share a short story reflecting on why clarity; education; and system-based inspection matter—now more than ever.


The first thing Elias Ward learned about chimneys was that fire never lies.

It bends rules; it finds shortcuts; it remembers every mistake ever made for it. And when it finally answers, it answers in heat and smoke and damage that no report can soften.

Elias learned this kneeling on a cold concrete floor, staring up into a flue that had no business still standing.

The house was intact. The owners were confused. The chimney—steel warped like melted ribbon—told a different story.

Everyone else called it “one of those things.”

Elias called it evidence.

He stood, brushed the dust from his knees, and did what he always did: he documented everything. Measurements; clearances; deformation angles; soot patterns. Not guesses. Not assumptions. Observations. Facts.

He didn’t know it then, but that habit—measure first, speak second—would change an entire industry.


At the time, chimney inspections were more tradition than science. Apprentices learned from masters; masters learned from whoever came before them. Manuals existed, sure, but most lived on shelves instead of jobsites. Reports were vague. Language was soft.

“Appears serviceable.”
“Recommend monitoring.”
“Use with caution.”

Elias hated those phrases.

They were lies dressed as courtesy.

Fire didn’t care about politeness.

So Elias began asking the questions no one wanted to slow down for.

Why does this clearance exist?
What happens when it’s violated?
Where is the test data?
What assumptions are we relying on that no longer hold?

The answers were scattered—across standards committees; buried in test reports; whispered between engineers who assumed no one outside their circle cared.

Elias cared.

At night, while others slept, he read. Codes. Standards. Test protocols. Failure reports. He learned how systems were supposed to work—not in ideal conditions, but when they aged; when they were modified; when homeowners and installers did what homeowners and installers always do.

He began to see chimneys not as parts, but as systems. Heat transfer. Airflow. Expansion. Containment. Every component bound by rules whether people acknowledged them or not.

And slowly, he saw the cracks—not in masonry or steel, but in understanding.


The first pushback came quietly.

“You’re overthinking it,” someone said during a training session.
“No one’s ever had a problem with that,” said another.
“We’ve always done it this way.”

Elias didn’t argue.

He brought photos.

He showed seams pulled apart by expansion. Framing charred where “no issue noted” once lived. Factory-built systems altered just enough to void every assumption they were tested under.

“This isn’t theory,” Elias said. “It’s history.”

People grew uncomfortable.

Comfort had always been the industry’s true fuel.


Change came the way most real change does—not with announcements, but with tools.

Elias built better documentation first. Clear language. Defined terms. Observations separated cleanly from interpretation. No recommendations unless standards were met—never “caution,” only compliance or noncompliance.

Then he built systems to support it.

Inspection workflows that forced inspectors to look where they usually didn’t. Checklists tied to actual failure modes, not habits. Visual documentation that made denial difficult and excuses impossible.

Reports stopped being opinions and started becoming records.

Attorneys noticed first.

Then insurers.

Then manufacturers—some defensive, some curious.

“Your reports are… different,” they said.
“They hold up,” said others.

Elias didn’t smile. He didn’t gloat.


Fire had taught him humility.

The turning point came after a winter fire that made the news.

No fatalities. Severe damage. A lawsuit everyone expected to settle quietly—until Elias was called in.

He didn’t accuse. He didn’t speculate.

He reconstructed the system.

He showed how a modification—minor, common, undocumented—changed heat paths. How a clearance once safe became lethal. How the system failed exactly as physics demanded it would.

The courtroom was silent.

Not because Elias was dramatic.

Because the fire finally had a translator.

The case didn’t just settle. It rewrote training materials.


Years passed.

Inspection language across the industry shifted. “Recommend monitoring” faded. Clear standards-based statements replaced it. Education programs began teaching why, not just how. Inspectors stopped being box-checkers and started becoming system evaluators.

Manufacturers updated manuals—because now someone would notice if they didn’t.

Homeowners began asking better questions.

Fire departments changed pre-incident planning.

And through it all, Elias kept inspecting.

Still kneeling. Still measuring. Still documenting.

Someone once asked him why he never branded himself as a revolutionary.

Elias thought of warped steel; of charred framing hidden behind drywall; of fires that waited years to answer.

“Fire already has rules,” he said. “I just write them down.”


On his last inspection before retirement, Elias stood in a quiet living room, sunlight catching the edge of a properly installed hearth.

Everything was correct. Clearances exact. Documentation thorough.

The homeowner thanked him.

“You’re very careful,” she said.

Elias nodded.

Careful wasn’t fear.

Careful was respect—for systems, for truth, for consequences.

As he left, he glanced once more at the chimney rising cleanly against the sky.

Fire would pass through it someday.

And when it did, it would behave.

Because someone finally listened.


Dedication

For the investigators who taught us that fire always leaves a record—if we know how to read it.

For the educators who insisted that inspection is not about memorizing rules; but about understanding why those rules exist.

This work is offered in appreciation of Dale Feb; Bill Ryan; and Mike Segerstrom, whose commitment to evidence-based investigation and meaningful instruction has shaped how many of us see; document; and explain the systems we inspect.

Their influence continues wherever clarity replaces assumption.


Author’s Note

This story is an allegory.

While fictional in its narrative, it reflects a real shift within the chimney and hearth industry—one driven not by technology alone, but by a growing commitment to system understanding, evidence-based inspection, and professional accountability.

At InspectionFire, our purpose aligns with that shift.

We believe inspections are not about filling forms or offering reassurance; they are about documenting systems as they exist; identifying deviations from tested and intended conditions; and communicating those findings clearly—without speculation and without dilution.

The individuals acknowledged in the dedication did not change the industry by being louder than others. They did so by being precise; disciplined; and willing to explain why things matter—even when that explanation was inconvenient.

Their influence shaped how many inspectors approach documentation; education; and responsibility today. This story exists to honor those principles and to reinforce the idea that meaningful progress in this industry comes from understanding systems—not shortcuts.

If this story resonates, it is because you recognize its truth from experience.

Fire does not negotiate.
Systems do not guess.
And clarity—when practiced consistently—changes outcomes.


At InspectionFire, we remain committed to tools; education; and workflows that support clarity; accountability; and better outcomes across the chimney and hearth industry.

Posted on

Release Notes – Custom Inspection v2.30 to v2.92

Here is a brief list of updates between v2.30 to v2.92 which will start to roll out to accounts today. Please contact our office if do not see it show up in your account soon. Vanessa will also reach out via text or phone to let you know it is there. 

PDF FORMATTING / OUTPUT

  • Line spacing for numerous fields in the PDF output updated to be consistent throughout the document
  • Additional spaces or page breaks showing up in the PDF output removed
  • Photo compression increased slightly to help keep submissions under 25 MB where large inspections are performed
  • Output changed to a link sent via email as opposed to the PDF itself. This is to help when large inspections exceed 25 MB as when size increases above that point the PDF may not generate as it cannot be emailed or received by most email providers. If larger the link still allows downloading and generation without issue. 

PHOTO DOCUMENTATION SCREEN

  • The pre-written notes screen and the checklists screen were combined into one screen so you can use either pre-written notes, or checklists, or both, and mix them back and forth throughout your report as you go.
  • The pre-written notes selection boxes were disconnected from each other so that you can change or edit prior selected pre-written notes, or remove them, without affecting selections after that point.
  • There are up to 7 prewritten notes per photo block entry you can choose and 56 checklists to choose from. 
  • Language in the pre-written note selections simplified for easier searching and viewing.

IN DEVELOPMENT FOR RELEASE SOON

  • Masonry measurements pull sheet and auto check function on dimensions and sizing. This is mostly complete, just waiting on the final design of the PDF output and testing. 
  • Dynamic data that pushes out and pulls in so that once company information, disclaimers, and prompts are set in any form they will pull into any forms where those fields are present so that they only have to be entered once and will update automatically as new versions of the forms are updated.

As always – PLEASE SEND FEEDBACK – and let us know if there are any updates or ideas you have. We are actively working on improving all aspects of the app and workflow. Thank you!

Posted on

Technician Acknowledgements in Chimney Inspection Reports

A technician’s signed acknowledgment is more than a formality—it is a professional declaration that the report accurately reflects the conditions present during the inspection or service visit. Including this statement ensures that your documentation meets the expectations of industry standards and stands up to scrutiny. The language below provides a clear, defensible way for technicians to affirm the accuracy and integrity of their observations.

***Please note that the language and disclaimers below are offered as a template for your convenience. They should be customized to fit your needs and the policies of your company. It is recommended that you consult with an attorney if you have any questions. While we have used these disclaimers for many years, be aware that by using these disclaimers you do so at your own risk.

Customer Acknowledgment

(In our reports, this section appears above the technician signature field. Schedule an app demo to learn more.)

I attest that this report accurately reflects the conditions present and observed at the time of site visit, inspection, installation, repair, rebuild, or replacement and as applicable is based on the level of inspection performed and the access that was permitted and possible surrounding the applicable system(s). I certify that I have completed this report and either discussed findings on-site with the client or made an attempt to contact them if they were not on-site at the conclusion of the inspection.

Posted on

Customer Acknowledgements in Chimney Inspection Reports

Documenting a client’s understanding of the inspection findings and scope is a crucial part of every chimney inspection. A strong customer acknowledgment ensures clarity about what was observed and that the client understands any limitations of the inspection, and whether the system is suitable for continued use. The language below provides a professional template to incorporate into your reports, helping you protect your company and confirm that the client has been properly informed.

***Please note that the language and disclaimers below are offered as a template for your convenience. They should be customized to fit your needs and the policies of your company. It is recommended that you consult with an attorney if you have any questions. While we have used these disclaimers for many years, be aware that by using these disclaimers you do so at your own risk.

Customer Acknowledgment

(In our reports, this section appears above the customer signature field. Schedule an app demo to learn more.)

The Contractor has explained to me the current visual condition of the systems or appliances inspected at this location, within the scope of the level of inspection performed or the access permitted and possible, as noted at the time of inspection. I understand this inspection was a visual inspection only and does not apply beyond the time of inspection. The Contractor cannot be held responsible for faults and defects that are out of the Contractors control or located in inaccessible areas. I acknowledge that I have been informed whether or not this system is suitable for continued use or if further research is required, and understand that recommendations will be made in this report. Further recommendations and options may accompany estimates separate from this report. I also understand that the Contractor may update the findings of this report at any time if new information is presented or available for review.

Posted on

Key Estimate Disclaimers for Chimney Inspection Reports

When providing estimates or ballpark figures as part of a chimney inspection or repair process, it’s important to clearly communicate the limits of those numbers. This disclaimer language helps manage client expectations around pricing, scope of work, and project timelines. The following templates are designed to clarify that estimates are non-binding and dependent on a variety of factors, helping to protect your company while offering transparent service to your clients.

***Please note that the language and disclaimers below are offered as a template for your convenience. They should be customized to fit your needs and the policies of your company. It is recommended that you consult with an attorney if you have any questions. While we have used these disclaimers for many years, be aware that by using these disclaimers you do so at your own risk.

ESTIMATE DISCLAIMERS

(In our reports, this section appears beneath the estimates, ballparks, and recommendations section. If left blank in the app, the disclaimers section will not appear in the report. Schedule an app demo to learn more.)

ADDITIONAL RECOMMENDATIONS, BALLPARK PRICING, OR ESTIMATES: Please contact our office regarding repairs or requested estimates. If an estimate was requested more detailed recommendations to repair this system and any associated ballpark numbers or estimates may come separate from this report. Before issuing final recommendations, ballpark numbers, or estimates we may require a conversation regarding your preferred method of repair, appliance or finishing desires, and noted deficiencies and repair methods that can address those issues.

TIME FRAME ON ESTIMATES: Please note that while we strive to get estimates out in a timely manner during some seasons of the year (September-March), and for certain types of estimates, additional time may be required. The time required to generate your estimate will depend upon our workload, the complexity of your system, noted deficiencies, the scope of work to be estimated, or the required methods of repair. We apologize for any delay. To expedite the process we invite you to give us a call at your convenience to nudge that process along and let us know if repairs are time-sensitive.

PARTIAL REPAIRS: As a company we have made the decision that we will not perform partial repairs unless they are to weatherproof or animal-proof a system. Partial repairs can otherwise give the impression that a system is ‘safe’ to use when issues still exist. Making a system ‘safer’ than it was, but still not repairing it to meet minimum code requirements or manufacturer instructions, can still leave you with a fire hazard in your home. We will not jeopardize your safety and well-being just to make a few bucks on partial repairs. Your life, and our livelihood, is not worth the compromise. Additionally, we do not recommend partial repairs are made on any system with the intent to use it.

Posted on

Key General Disclaimers for Chimney Inspection Reports

Clear and accurate general disclaimers are essential in any chimney inspection report. They help define the scope of the inspection, establish the limits of liability, and ensure clients understand that findings apply only to accessible areas and conditions present at the time of inspection. This section includes time-tested language designed to help chimney professionals protect their business while maintaining transparency with clients. Review, copy, and customize the text below to align with your company’s practices and legal guidance.

***Please note that the language and disclaimers below are offered as a template for your convenience. They should be customized to fit your needs and the policies of your company. It is recommended that you consult with an attorney if you have any questions. While we have used these disclaimers for many years, be aware that by using these disclaimers you do so at your own risk.

COMPANY DISCLAIMERS

(In our reports, this section appears on a separate page before the signature page. If left blank, the disclaimers section will not appear in the report. Schedule an app demo to learn more.)

Ownership: This report is the exclusive property of the inspection client as indicated in this document, or the inspection company. If this inspection takes place during the resale or any transaction of property, we recommend that all repair suggestions we make within this report be completed well before the close of escrow by licensed specialists, who may identify additional defects or recommend upgrades that could affect the evaluation of this property. 

Inspection Standards: You have received a professional report that may or may not include NFPA 211 style inspections, as indicated in this document. No Inspector opinion is involved in system deficiencies observed. Photos or videos taken at the time of inspection or site visit may be logged and kept on permanent digital file. Where inspections are performed, they are based on the requirements set forth by the National Fire Protection Association in the NFPA 211  Inspection Standard. These Inspection Standards are recognized throughout the United States by the Fireplace and  Venting Industry as “The Industry Standards.” Based on this fact, the inspector is professionally and legally obligated to abide by these standards. The Client has a right to negate or dismiss any portion or all of these standards. Please be notified, however, that this action may release the inspector from any liability and relinquish your rights to seek reimbursement for damages. These standards are recommended in the best interest of all parties. 

General Disclaimers: A Level II inspection is required for all new clients, for the sale or purchase of any property, and for the conditions requiring a Level II inspection as outlined in the NFPA 211, the standard of care for our industry.  Any findings may not apply beyond the date of inspection and are only indicative of conditions present during the inspection. Client understands that any inspection was limited to those areas within the scope of the level of inspection performed at the time of inspection but may be limited due to inaccessible areas, weather, chimney height, roof pitch,  snow load, or other safety factors. At no point is it implied that every possible deficiency has been noted.  The inspector reserves the right to amend their findings, as applicable, and in conformance with the standard of care in our industry. If the client listed in this report chooses to ignore or decline recommendations supplied within this report, the client willfully releases the inspection company and their employees of all liability for any property damage, personal injury, or loss of life.

Rooftop Access: The client understands that the inspector may be required to walk on the roof to gain access to the chimney and adjacent areas. The inspector will use reasonable care to avoid damage to the roof. However, damage to the roof may occur. It is understood that the inspector will not be held responsible for any damage or repair whatsoever to the roof as a result of this inspection.

Inaccessible Areas: The client understands that the Inspector likely cannot obtain access to certain portions of the fireplace and certain enclosed or concealed adjacent areas due to lack of access or safety hazards to the inspector. The Inspector will make this determination based on the accessibility, material condition or type, site conditions, safe practices, and weather conditions as found at the time of inspection. The Inspector makes no representations express or implied and will not be responsible in any way whatsoever for deficiencies, improper installation, or improper equipment in inaccessible areas or those masked by paint or other materials. The findings listed within this report are based on the condition of the appliance or system at the time of this inspection and may be limited due to access granted or the type of inspection requested.

Recommendations: Given for the service of our clients recommendations in no way indicate a contract, proposal, or offer to perform work. Ballparks for recommendations may be included in this report, come separately as an addendum to this report, or be given verbally over the phone. Any ballpark pricing is considered a best-guess estimate only.  Variations in pricing may occur based on materials used, unknown deficiencies in currently inaccessible areas, or the scope of work to be performed. 

Posted on

Explaining Carbon Monoxide (CO) Spillage to Homeowners: A Guide for Inspection Professionals

How to Communicate the Hidden Danger of CO Spillage

As an inspection professional, your job isn’t just to inspect—it’s to persuade, guide, and ensure safety. Homeowners assume that if their heating system, fireplace, or chimney has worked fine for years, they’re in the clear. That’s the trap. CO is silent, invisible, and deadly. Your job is to help them see the unseen and take action before it’s too late.

Key Concepts to Explain to the Homeowner

1. What Is Carbon Monoxide and Why Is It Dangerous?

Carbon monoxide is an odorless, colorless gas that can quietly fill your home without you knowing. It comes from incomplete combustion, and if it’s not vented properly, it can turn a safe space into a deadly one.

CO doesn’t announce itself. There’s no smell, no visible smoke—just symptoms that mimic the flu. Headaches. Dizziness. Nausea. And if ignored? The consequences can be fatal.

2. Why CO Spillage Happens

Your venting system is designed to remove CO safely. But if something disrupts that process—if the draft isn’t right, if a blockage forms, if negative air pressure pulls gases the wrong way—CO can spill right back into your home.

At this point, show homeowners the evidence—the drafting issues, the venting blockages, the appliance malfunctions. Make the invisible visible.

3. Common Causes of CO Spillage

Explain the root problems in a way that lands:

  • Blocked or Restricted Venting – “Your system relies on a clear path to vent. If there’s creosote buildup, debris, or even an animal nest in there, CO has nowhere to go but back into your home.”
  • Negative Air Pressure – “Your home is working against itself. When exhaust fans, dryers, or range hoods pull air out faster than it can come in, it creates a vacuum that pulls CO back in instead of pushing it out.”
  • Cracked or Deteriorated Chimney Liner – “Think of your chimney liner like a hose. If it’s cracked or broken, it leaks. And in this case, what’s leaking is carbon monoxide.”
  • Improper Appliance Sizing or Installation – “If the system isn’t matched properly, it won’t vent right. And when it doesn’t vent right, CO stays inside.”
  • Lack of Maintenance – “A dirty system doesn’t work like it should. Regular maintenance isn’t just about performance—it’s about safety.”
  • House Pressure Issues – “Your house is built tight for efficiency, but that same efficiency can trap CO inside. The way air moves through your home can either help or hurt.”

How to Present Your Findings

1. Keep It Direct, Keep It Real

Don’t soften the truth, but don’t alarm them either. Your tone should say: I know what I’m talking about, and I’m here to help you stay safe.

“I’m seeing signs that CO could be spilling back into your home. Since CO is odorless and invisible, you wouldn’t know it unless a detector goes off, or until symptoms show up—or worse. Let’s talk about what we can do to fix this now.”

2. Show, Don’t Just Tell

People believe what they see. Use every tool you have:

  • Photos of blockages, damage, or improper installations.
  • Smoke or draft tests to illustrate airflow issues.
  • CO detector readings to prove the problem in real-time.

Make them feel like they’ve discovered the issue alongside you.

3. Offer Actionable Next Steps

Instead of overwhelming them with problems, make the solution simple and clear:

  • Further Testing: “We need to run a draft test or combustion analysis to confirm the full extent of the issue.”
  • Chimney and Appliance Maintenance: “A full cleaning and inspection can eliminate blockages and improve how your system vents.”
  • Liner or Venting Repairs: “If the liner is cracked or deteriorated, replacing it will ensure that gases get outside—not into your home.”
  • Installing CO Detectors: “A CO detector isn’t optional. It’s your only real-time warning system, and every home should have them on each level.”
  • Addressing House Pressure Issues: “We may need to adjust ventilation, introduce makeup air, or modify exhaust systems to balance air pressure and keep CO out.”

Handling Homeowner Pushback

They’ll say: “But we’ve never had a problem before.”

Your response should gently and guide the conversation and reframe their perspective:

“That’s exactly what makes CO so dangerous—it builds up slowly, and by the time you notice it, it might be too late. Just because nothing bad has happened yet doesn’t mean you’re in the clear. There is evidence that combustion byproducts are making their way into your home. The best time to fix this is before it becomes a crisis.”

They might hesitate: “How do I know this is really necessary?”

You respond with tactical empathy:

“I get it. You’ve used this system for years, and no one wants to hear there’s a safety issue. But if I were in your shoes, I’d want to know. This isn’t a ‘maybe’ problem—this is a ‘when’ problem. And the fix is simple if we do it now.”

Final Thoughts: Your Role as an Educator and Negotiator

You’re not just an inspector—you’re a trusted advisor. Your words, your delivery, and your ability to guide the conversation will determine whether the homeowner takes action or walks away from a serious hazard.

The way you communicate this risk can be the difference between a safe home and a future emergency. Speak with authority, show them the problem, and make the solution easy to say yes to.

Because in the end, this isn’t about fixing a system—it’s about saving lives.

Example Explanation to Include In Your Report

CARBON MONOXIDE—THE SILENT KILLER

Your fireplace, heating appliance, or chimney may seem to work just fine—but that doesn’t mean it’s safe. Carbon monoxide (CO) spillage is a dangerous warning sign that something in your system isn’t functioning correctly. Unlike smoke, CO is invisible, odorless, and tasteless, making it nearly impossible to detect without specialized equipment.

Why Is CO Spillage a Problem?

A properly functioning chimney or venting system is designed to safely remove combustion gases, including CO, from your home. When something disrupts this process, those gases can leak into your living space, creating a serious health risk.

Common Causes of CO Spillage:

  1. Blocked or Restricted Venting – Creosote buildup, debris, or structural damage can prevent proper airflow, forcing combustion gases back into the home.
  2. Negative Air Pressure – High-efficiency exhaust fans, tightly sealed homes, or competing appliances (such as range hoods, dryers, or other HVAC systems) can pull air away from the chimney, causing backdrafting.
  3. Liner or Chimney Damage – Cracks, deterioration, or improper installation can lead to leaks, allowing CO and other harmful gases to escape into walls or living areas.
  4. Oversized or Undersized Chimneys – An improperly sized flue can lead to poor draft conditions, causing gases to spill rather than venting correctly.
  5. Appliance Malfunction – Defective or improperly installed heating appliances can produce excessive CO or fail to vent correctly.

“But We Haven’t Had Any Issues…”

CO poisoning doesn’t always happen suddenly—it can accumulate at low levels over time, leading to chronic health problems before an acute event occurs. Symptoms like headaches, dizziness, nausea, and confusion are often mistaken for other illnesses. Worse yet, prolonged exposure can be fatal.

Prevention Is the Only Safe Option

The fact that CO is undetectable without specialized equipment makes it one of the most insidious dangers in a home. Proper maintenance, inspections, and ensuring your system meets minimum safety standards are the only ways to protect your household from this invisible threat.