
A chimney inspection software demo should not begin and end with the final PDF.
The report matters. It is what the client sees. It is what the office stores. It is what may later be reviewed by a Realtor, insurer, attorney, AHJ, repair technician, or another chimney professional.
But the report is only the output.
The more important question is what happened before the report was generated.
Did the software guide the inspection?
Did it identify the system?
Did it preserve the scope?
Did it separate Observations from Nothing to Report?
Did it document Limitations clearly?
Did it connect photo and video evidence to the correct location and recommendation?
A polished report can still be weak if the workflow that created it was incomplete.
That is why anyone evaluating a chimney inspection software demo should look beyond formatting, logos, signatures, and page layout.
The real test is whether the software supports professional inspection logic before the report is produced.
A Good Demo Should Not Start With the Final PDF
Most demos eventually show the finished report.
That is useful, but it should not be the first thing you evaluate.
A PDF can look clean while still hiding workflow problems. It may contain photos, but not explain where they were taken. It may list recommendations, but not connect them to Observed Conditions. It may include a Level II label, but not show what was accessible, inaccessible, limited, excluded, or not applicable.
A strong demo should show the inspection being built.
Watch for the steps before the output:
- System setup;
- Inspection reason;
- Inspection level;
- Included and excluded areas;
- Access conditions;
- Photo and video capture;
- Observations;
- Observed Conditions;
- Nothing to Report;
- Limitations;
- Recommendations;
- Final review.
If the demo jumps straight from “select a template” to “generate report,” ask what happened in between.
That is where the inspection record is either strengthened or weakened.
First Question: Does the Software Understand Chimney Systems?
Chimney and fireplace inspections are not generic property checklists.
A property may have one masonry fireplace, three factory-built fireplaces, a wood stove, a gas insert, a furnace vent, a boiler vent, a dryer vent, multiple flues in one chimney, or multiple systems in a common chase.
The demo should show how the software identifies each system separately.
A report should not leave the reader guessing:
- which flue was scanned;
- which fireplace had the Observed Condition;
- which appliance the connector photo belongs to;
- which chimney the recommendation applies to;
- which system was included, excluded, or limited.
This is one of the clearest differences between chimney-specific software and generic report-writing tools.
Generic tools may let an inspector upload photos and write notes. A chimney-specific workflow should help the inspector connect those notes and photos to the correct fireplace, chimney, vent, flue, appliance, or component.
If the demo cannot clearly separate multiple systems, the final report may become ambiguous.
Watch How the Demo Handles Inspection Scope
Inspection scope should not be decorative language at the top of the report.
It should affect the workflow.
During a demo, look for how the software handles:
- Level I inspections;
- Level II inspections;
- limited visual inspections;
- repair follow-up inspections;
- post-event evaluations;
- home inspector chimney referrals;
- system-specific exclusions;
- inaccessible areas;
- client-requested scope limits.
A Level I inspection and a Level II inspection should not simply be two different report titles.
The software should help document what was actually included under the inspection scope. NFPA-related public committee material distinguishes between Level I readily accessible scope and Level II accessible-area scope, including image-scanning expectations for accessible internal flue surfaces where needed.
That does not mean software performs the inspection.
It means the software should help the technician document the inspection accurately.
If the demo shows Level I or Level II only as a dropdown field, that is not enough.
The better demo shows how that selection changes the questions, sections, documentation expectations, and report review.
Look for System Identity Before Photos
Photo documentation is one of the easiest places for software to look better than it is.
Almost every inspection app can hold photos.
That is not the same as inspection photo documentation.
During the demo, ask:
- Where does the photo go?
- Which system does it belong to?
- What location does it document?
- Does it support an Observation, Limitation, or Recommendation?
- Can it be connected to an image scan?
- Can the office reviewer understand it later?
- Does the final report explain what the image means, or why it matters?
A disconnected photo gallery is not enough.
A chimney inspection photo should be part of the inspection record, not an attachment at the end of the job.
The goal is not more pictures; the goal is clearer evidence.
Look for Observations, Not Loose Notes
A good inspection workflow should distinguish between casual notes and reportable Observations.
That distinction matters.
A technician may write many field notes during an inspection. Not all of them belong in the final report. Some are reminders. Some are measurements. Some are job-planning notes. Some are client communication details. Some are reportable Observed Conditions.
The software should help the technician organize those pieces.
A strong demo should show how an Observation is created, where it lives, how it connects to evidence, and how it supports a Recommendation.
The stronger chain is:
System identified → area inspected or limitation documented → evidence captured → Observation stated → Recommendation provided.
The weaker version is:
Photo uploaded → note typed → report generated.
That second workflow may be faster, but it is not necessarily defensible.
Look for “Nothing to Report” Without Hiding Limitations
This is one of the most important demo details.
A section with Nothing to Report is not the same as a section that was skipped.
Nothing to Report should mean:
The section was included and observed within the applicable scope, and no reportable Observed Condition was documented.
It should not mean:
- not inspected;
- inaccessible;
- excluded;
- not applicable;
- forgotten;
- outside scope;
- hidden by construction;
- blocked by debris;
- unsafe to access.
During the demo, look for how the software handles section status.
A strong workflow should distinguish:
- Observation;
- Nothing to Report;
- Limitation;
- Inaccessible;
- Not Applicable;
- Excluded;
- further evaluation recommended.
If the demo only shows “pass/fail,” “defect/no defect,” or “satisfactory/unsatisfactory,” ask how the software documents uncertainty, limited access, and non-applicable sections.
That is where many reports become too confident.
Look for Camera and Image-Scanning Documentation
A chimney camera can capture valuable visual information.
But the camera is not the inspection by itself.
The demo should show how camera or video evidence is documented inside the report workflow. For Level II-type workflows, this matters because public NFPA committee material refers to examining accessible internal flue surfaces with image scanning equipment or more advanced technological viewing systems where needed to observe those areas.
A strong software demo should show how the inspector records:
- which flue or vent was scanned;
- whether the scan was from the top, bottom, or both;
- whether the scan was complete;
- what limited the scan;
- which still images support the Observation;
- which video or image evidence belongs to the final report;
- whether further evaluation, cleaning, repair, or use restriction is recommended.
Be cautious with any demo that treats “camera used” as the entire documentation.
The report should explain what the camera evidence means.
Look for Level I and Level II Workflow Control
Level I and Level II are not just labels.
They are scope-control decisions.
A demo should show how the software helps the technician document:
- reason for inspection;
- inspection level;
- system type;
- connected appliances;
- accessible areas;
- readily accessible areas;
- inaccessible areas;
- limitations;
- image-scanning status;
- Observations;
- Recommendations.
This does not mean the software should force the same path for every system.
It should guide the inspector while still allowing professional judgment.
A masonry fireplace, factory-built fireplace, wood stove, gas insert, pellet appliance, furnace vent, boiler vent, and dryer vent do not all require identical documentation. The workflow should be structured enough to prevent missed documentation, but flexible enough to reflect the actual system.
That balance is what to look for in the demo.
Look for Home Inspector Boundary Control
Home inspectors need special attention here.
A general home inspection may include visible fireplace and chimney observations. That does not automatically mean the inspector performed a chimney-specific Level I or Level II inspection.
InterNACHI’s Standards of Practice require inspection of readily accessible and visible portions of fireplaces and chimneys, but they also state that inspectors are not required to inspect the flue or vent system or the interior of chimneys or flues.
That distinction should be visible in the software.
A good demo should show how the report separates:
- general home inspection fireplace notes;
- chimney referral language;
- limited visible observations;
- Level I chimney inspection work;
- Level II chimney inspection work;
- image-scanning documentation;
- excluded or inaccessible areas;
- recommendations before use or before closing.
If the software blurs those categories, it may create reports that imply more than was actually inspected.
That is not a formatting problem.
It is a scope problem.
Look for Office Review and Technician Consistency
For a one-person company, software may primarily save time.
For a multi-technician company, software also has to reduce variation.
During the demo, look for how the workflow supports consistency across technicians.
Ask whether the software helps standardize:
- inspection setup;
- terminology;
- photo placement;
- system naming;
- limitation language;
- recommendation structure;
- report review;
- technician accountability;
- office access to submissions;
- company-wide report output.
InspectionFire’s software page specifically identifies guided workflow, photo documentation, built-in checklists, professional PDF reports, multi-technician plans, office portal access, and company-wide report management as part of the platform structure.
The goal is not to make every technician sound identical.
The goal is to make the company’s documentation logic consistent.
What Not to Be Distracted By
A demo can look impressive without answering the important questions.
Do not overvalue:
- attractive report formatting alone;
- fast PDF generation alone;
- large photo galleries alone;
- generic checklist libraries;
- vague “AI report writing” claims;
- one-click recommendations with no supporting Observation;
- pass/fail language without limitation handling;
- software claims that imply compliance without qualified professional judgment.
Speed matters.
Presentation matters.
But in chimney, fireplace, venting, and appliance inspections, documentation integrity matters more.
A faster weak report is still a weak report.
What to Watch for During the InspectionFire Pro Launch Preview
The InspectionFire Pro Launch Preview is today from 3–4 PM MST.
The practical question to keep in mind during the preview is simple:
Does the workflow preserve the inspection record before the report is generated?
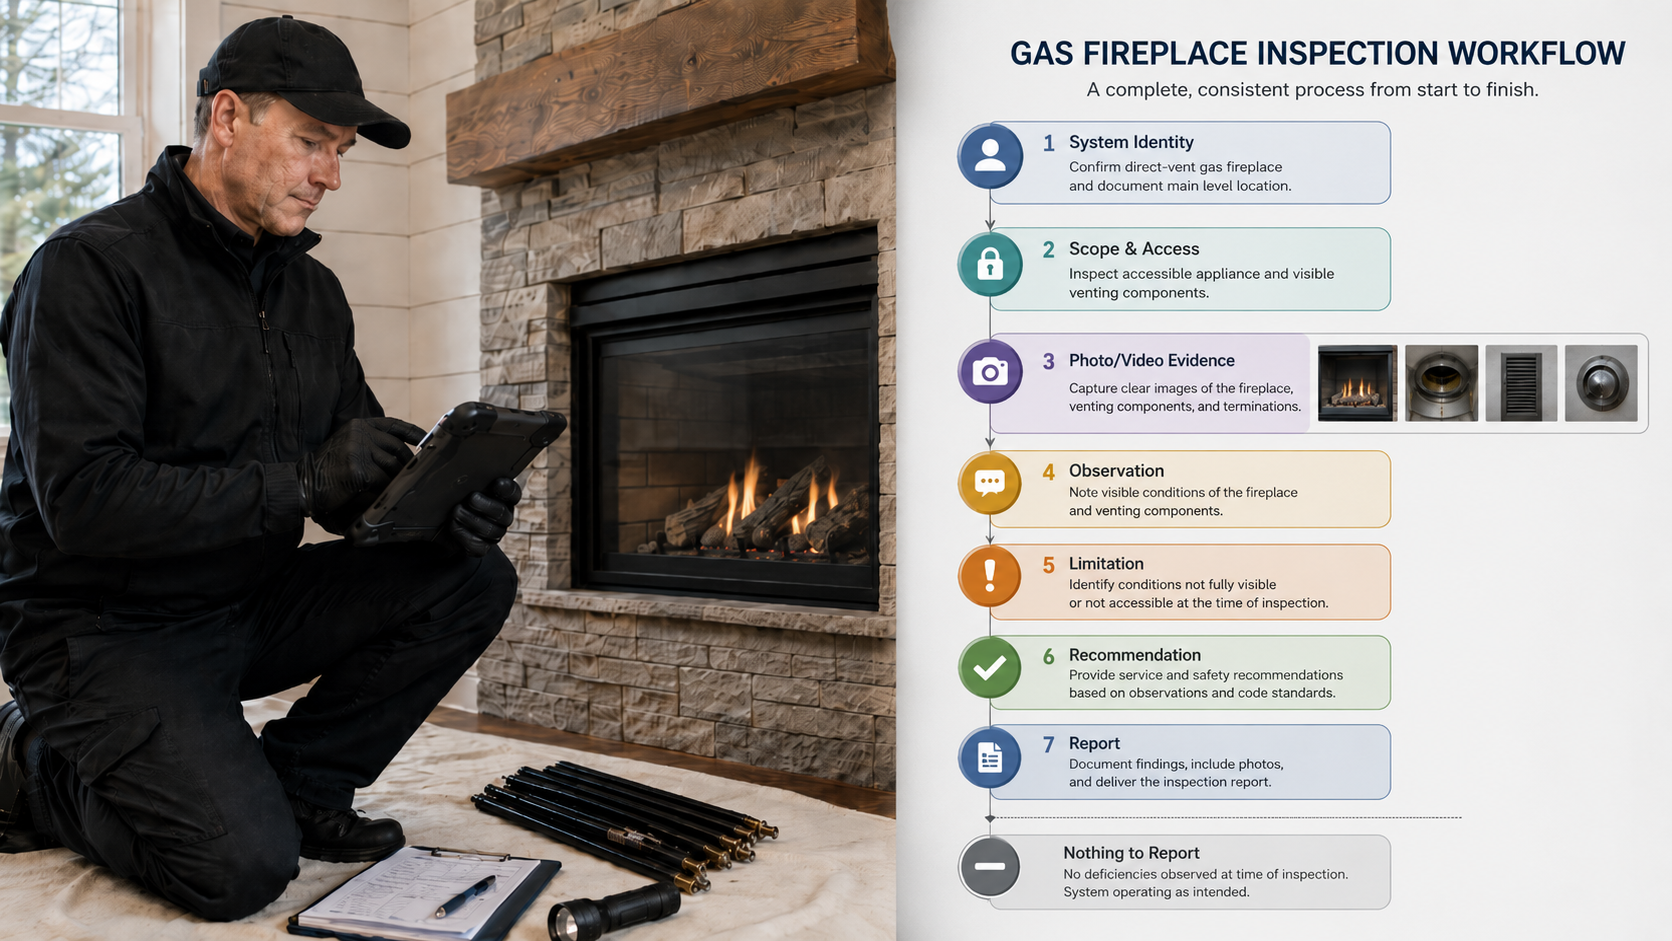
Watch for how the platform handles:
- system identity;
- guided workflow;
- photo and video evidence;
- Observations;
- Observed Conditions;
- Nothing to Report;
- Limitations;
- Recommendations;
- report generation;
- technician consistency;
- office review.
That is the difference between a reporting tool and a professional inspection system.
Bottom Line
A chimney inspection software demo should show more than a clean report.
It should show how the inspection is controlled before the report exists.
Look for system identity.
Look for scope control.
Look for photo and video evidence tied to context.
Look for Observations, Limitations, Recommendations, and Nothing to Report.
Look for Level I and Level II workflows that respect access and actual field conditions.
Look for home inspector boundary control.
Look for team consistency without removing professional judgment.
The final PDF matters.
But the workflow matters more.
See the Difference. Schedule a Walkthrough.
InspectionFire Pro is being previewed today from 3–4 PM MST. The preview is a practical look at how guided chimney, fireplace, venting, and appliance workflows can support evidence capture, Observations, Limitations, Recommendations, technician consistency, and professional report output.
FAQ Section
What should I look for in a chimney inspection software demo?
Look for the workflow before the report. The demo should show how the software identifies systems, documents scope, captures photos or video, records Observations, separates Nothing to Report from limitations, and connects Recommendations to observed conditions.
Is a clean PDF enough to evaluate chimney inspection software?
No. A clean PDF is useful, but it does not prove that the inspection workflow was complete. The demo should show how the report was built before the PDF was generated.
Should chimney inspection software support Level I and Level II workflows?
Yes. The software should help document inspection level, reason for inspection, system type, accessible areas, inaccessible areas, limitations, image-scanning status, Observations, and Recommendations.
What is the difference between a photo upload feature and photo documentation?
A photo upload feature stores images. Photo documentation connects each image to the correct system, location, observed condition, limitation, and recommendation.
What should “Nothing to Report” mean in inspection software?
Nothing to Report should mean the section was included and observed within the applicable scope, but no reportable Observed Condition was documented. It should not be used for inaccessible, excluded, skipped, or not applicable sections.
Can chimney inspection software replace inspector judgment?
No. Software should organize professional judgment, not replace it. The inspector still evaluates the actual system, access, condition, limitations, and appropriate recommendation.
Why is home inspector scope important in fireplace and chimney reporting?
A general home inspection may include visible fireplace and chimney observations, but it usually does not include full chimney-specific inspection of flue interiors, concealed areas, or Level II-style image scanning unless that service is specifically included.
Why does system identity matter in chimney inspection software?
System identity prevents ambiguity. In homes with multiple fireplaces, chimneys, flues, vents, or appliances, every Observation, photo, limitation, and recommendation should be tied to the correct system.