Posted on

Key Estimate Disclaimers for Chimney Inspection Reports

When providing estimates or ballpark figures as part of a chimney inspection or repair process, it’s important to clearly communicate the limits of those numbers. This disclaimer language helps manage client expectations around pricing, scope of work, and project timelines. The following templates are designed to clarify that estimates are non-binding and dependent on a variety of factors, helping to protect your company while offering transparent service to your clients.

***Please note that the language and disclaimers below are offered as a template for your convenience. They should be customized to fit your needs and the policies of your company. It is recommended that you consult with an attorney if you have any questions. While we have used these disclaimers for many years, be aware that by using these disclaimers you do so at your own risk.

ESTIMATE DISCLAIMERS

(In our reports, this section appears beneath the estimates, ballparks, and recommendations section. If left blank in the app, the disclaimers section will not appear in the report. Schedule an app demo to learn more.)

ADDITIONAL RECOMMENDATIONS, BALLPARK PRICING, OR ESTIMATES: Please contact our office regarding repairs or requested estimates. If an estimate was requested more detailed recommendations to repair this system and any associated ballpark numbers or estimates may come separate from this report. Before issuing final recommendations, ballpark numbers, or estimates we may require a conversation regarding your preferred method of repair, appliance or finishing desires, and noted deficiencies and repair methods that can address those issues.

TIME FRAME ON ESTIMATES: Please note that while we strive to get estimates out in a timely manner during some seasons of the year (September-March), and for certain types of estimates, additional time may be required. The time required to generate your estimate will depend upon our workload, the complexity of your system, noted deficiencies, the scope of work to be estimated, or the required methods of repair. We apologize for any delay. To expedite the process we invite you to give us a call at your convenience to nudge that process along and let us know if repairs are time-sensitive.

PARTIAL REPAIRS: As a company we have made the decision that we will not perform partial repairs unless they are to weatherproof or animal-proof a system. Partial repairs can otherwise give the impression that a system is ‘safe’ to use when issues still exist. Making a system ‘safer’ than it was, but still not repairing it to meet minimum code requirements or manufacturer instructions, can still leave you with a fire hazard in your home. We will not jeopardize your safety and well-being just to make a few bucks on partial repairs. Your life, and our livelihood, is not worth the compromise. Additionally, we do not recommend partial repairs are made on any system with the intent to use it.

Posted on

Key General Disclaimers for Chimney Inspection Reports

Clear and accurate general disclaimers are essential in any chimney inspection report. They help define the scope of the inspection, establish the limits of liability, and ensure clients understand that findings apply only to accessible areas and conditions present at the time of inspection. This section includes time-tested language designed to help chimney professionals protect their business while maintaining transparency with clients. Review, copy, and customize the text below to align with your company’s practices and legal guidance.

***Please note that the language and disclaimers below are offered as a template for your convenience. They should be customized to fit your needs and the policies of your company. It is recommended that you consult with an attorney if you have any questions. While we have used these disclaimers for many years, be aware that by using these disclaimers you do so at your own risk.

COMPANY DISCLAIMERS

(In our reports, this section appears on a separate page before the signature page. If left blank, the disclaimers section will not appear in the report. Schedule an app demo to learn more.)

Ownership: This report is the exclusive property of the inspection client as indicated in this document, or the inspection company. If this inspection takes place during the resale or any transaction of property, we recommend that all repair suggestions we make within this report be completed well before the close of escrow by licensed specialists, who may identify additional defects or recommend upgrades that could affect the evaluation of this property. 

Inspection Standards: You have received a professional report that may or may not include NFPA 211 style inspections, as indicated in this document. No Inspector opinion is involved in system deficiencies observed. Photos or videos taken at the time of inspection or site visit may be logged and kept on permanent digital file. Where inspections are performed, they are based on the requirements set forth by the National Fire Protection Association in the NFPA 211  Inspection Standard. These Inspection Standards are recognized throughout the United States by the Fireplace and  Venting Industry as “The Industry Standards.” Based on this fact, the inspector is professionally and legally obligated to abide by these standards. The Client has a right to negate or dismiss any portion or all of these standards. Please be notified, however, that this action may release the inspector from any liability and relinquish your rights to seek reimbursement for damages. These standards are recommended in the best interest of all parties. 

General Disclaimers: A Level II inspection is required for all new clients, for the sale or purchase of any property, and for the conditions requiring a Level II inspection as outlined in the NFPA 211, the standard of care for our industry.  Any findings may not apply beyond the date of inspection and are only indicative of conditions present during the inspection. Client understands that any inspection was limited to those areas within the scope of the level of inspection performed at the time of inspection but may be limited due to inaccessible areas, weather, chimney height, roof pitch,  snow load, or other safety factors. At no point is it implied that every possible deficiency has been noted.  The inspector reserves the right to amend their findings, as applicable, and in conformance with the standard of care in our industry. If the client listed in this report chooses to ignore or decline recommendations supplied within this report, the client willfully releases the inspection company and their employees of all liability for any property damage, personal injury, or loss of life.

Rooftop Access: The client understands that the inspector may be required to walk on the roof to gain access to the chimney and adjacent areas. The inspector will use reasonable care to avoid damage to the roof. However, damage to the roof may occur. It is understood that the inspector will not be held responsible for any damage or repair whatsoever to the roof as a result of this inspection.

Inaccessible Areas: The client understands that the Inspector likely cannot obtain access to certain portions of the fireplace and certain enclosed or concealed adjacent areas due to lack of access or safety hazards to the inspector. The Inspector will make this determination based on the accessibility, material condition or type, site conditions, safe practices, and weather conditions as found at the time of inspection. The Inspector makes no representations express or implied and will not be responsible in any way whatsoever for deficiencies, improper installation, or improper equipment in inaccessible areas or those masked by paint or other materials. The findings listed within this report are based on the condition of the appliance or system at the time of this inspection and may be limited due to access granted or the type of inspection requested.

Recommendations: Given for the service of our clients recommendations in no way indicate a contract, proposal, or offer to perform work. Ballparks for recommendations may be included in this report, come separately as an addendum to this report, or be given verbally over the phone. Any ballpark pricing is considered a best-guess estimate only.  Variations in pricing may occur based on materials used, unknown deficiencies in currently inaccessible areas, or the scope of work to be performed. 

Posted on

Explaining Carbon Monoxide (CO) Spillage to Homeowners: A Guide for Inspection Professionals

How to Communicate the Hidden Danger of CO Spillage

As an inspection professional, your job isn’t just to inspect—it’s to persuade, guide, and ensure safety. Homeowners assume that if their heating system, fireplace, or chimney has worked fine for years, they’re in the clear. That’s the trap. CO is silent, invisible, and deadly. Your job is to help them see the unseen and take action before it’s too late.

Key Concepts to Explain to the Homeowner

1. What Is Carbon Monoxide and Why Is It Dangerous?

Carbon monoxide is an odorless, colorless gas that can quietly fill your home without you knowing. It comes from incomplete combustion, and if it’s not vented properly, it can turn a safe space into a deadly one.

CO doesn’t announce itself. There’s no smell, no visible smoke—just symptoms that mimic the flu. Headaches. Dizziness. Nausea. And if ignored? The consequences can be fatal.

2. Why CO Spillage Happens

Your venting system is designed to remove CO safely. But if something disrupts that process—if the draft isn’t right, if a blockage forms, if negative air pressure pulls gases the wrong way—CO can spill right back into your home.

At this point, show homeowners the evidence—the drafting issues, the venting blockages, the appliance malfunctions. Make the invisible visible.

3. Common Causes of CO Spillage

Explain the root problems in a way that lands:

  • Blocked or Restricted Venting – “Your system relies on a clear path to vent. If there’s creosote buildup, debris, or even an animal nest in there, CO has nowhere to go but back into your home.”
  • Negative Air Pressure – “Your home is working against itself. When exhaust fans, dryers, or range hoods pull air out faster than it can come in, it creates a vacuum that pulls CO back in instead of pushing it out.”
  • Cracked or Deteriorated Chimney Liner – “Think of your chimney liner like a hose. If it’s cracked or broken, it leaks. And in this case, what’s leaking is carbon monoxide.”
  • Improper Appliance Sizing or Installation – “If the system isn’t matched properly, it won’t vent right. And when it doesn’t vent right, CO stays inside.”
  • Lack of Maintenance – “A dirty system doesn’t work like it should. Regular maintenance isn’t just about performance—it’s about safety.”
  • House Pressure Issues – “Your house is built tight for efficiency, but that same efficiency can trap CO inside. The way air moves through your home can either help or hurt.”

How to Present Your Findings

1. Keep It Direct, Keep It Real

Don’t soften the truth, but don’t alarm them either. Your tone should say: I know what I’m talking about, and I’m here to help you stay safe.

“I’m seeing signs that CO could be spilling back into your home. Since CO is odorless and invisible, you wouldn’t know it unless a detector goes off, or until symptoms show up—or worse. Let’s talk about what we can do to fix this now.”

2. Show, Don’t Just Tell

People believe what they see. Use every tool you have:

  • Photos of blockages, damage, or improper installations.
  • Smoke or draft tests to illustrate airflow issues.
  • CO detector readings to prove the problem in real-time.

Make them feel like they’ve discovered the issue alongside you.

3. Offer Actionable Next Steps

Instead of overwhelming them with problems, make the solution simple and clear:

  • Further Testing: “We need to run a draft test or combustion analysis to confirm the full extent of the issue.”
  • Chimney and Appliance Maintenance: “A full cleaning and inspection can eliminate blockages and improve how your system vents.”
  • Liner or Venting Repairs: “If the liner is cracked or deteriorated, replacing it will ensure that gases get outside—not into your home.”
  • Installing CO Detectors: “A CO detector isn’t optional. It’s your only real-time warning system, and every home should have them on each level.”
  • Addressing House Pressure Issues: “We may need to adjust ventilation, introduce makeup air, or modify exhaust systems to balance air pressure and keep CO out.”

Handling Homeowner Pushback

They’ll say: “But we’ve never had a problem before.”

Your response should gently and guide the conversation and reframe their perspective:

“That’s exactly what makes CO so dangerous—it builds up slowly, and by the time you notice it, it might be too late. Just because nothing bad has happened yet doesn’t mean you’re in the clear. There is evidence that combustion byproducts are making their way into your home. The best time to fix this is before it becomes a crisis.”

They might hesitate: “How do I know this is really necessary?”

You respond with tactical empathy:

“I get it. You’ve used this system for years, and no one wants to hear there’s a safety issue. But if I were in your shoes, I’d want to know. This isn’t a ‘maybe’ problem—this is a ‘when’ problem. And the fix is simple if we do it now.”

Final Thoughts: Your Role as an Educator and Negotiator

You’re not just an inspector—you’re a trusted advisor. Your words, your delivery, and your ability to guide the conversation will determine whether the homeowner takes action or walks away from a serious hazard.

The way you communicate this risk can be the difference between a safe home and a future emergency. Speak with authority, show them the problem, and make the solution easy to say yes to.

Because in the end, this isn’t about fixing a system—it’s about saving lives.

Example Explanation to Include In Your Report

CARBON MONOXIDE—THE SILENT KILLER

Your fireplace, heating appliance, or chimney may seem to work just fine—but that doesn’t mean it’s safe. Carbon monoxide (CO) spillage is a dangerous warning sign that something in your system isn’t functioning correctly. Unlike smoke, CO is invisible, odorless, and tasteless, making it nearly impossible to detect without specialized equipment.

Why Is CO Spillage a Problem?

A properly functioning chimney or venting system is designed to safely remove combustion gases, including CO, from your home. When something disrupts this process, those gases can leak into your living space, creating a serious health risk.

Common Causes of CO Spillage:

  1. Blocked or Restricted Venting – Creosote buildup, debris, or structural damage can prevent proper airflow, forcing combustion gases back into the home.
  2. Negative Air Pressure – High-efficiency exhaust fans, tightly sealed homes, or competing appliances (such as range hoods, dryers, or other HVAC systems) can pull air away from the chimney, causing backdrafting.
  3. Liner or Chimney Damage – Cracks, deterioration, or improper installation can lead to leaks, allowing CO and other harmful gases to escape into walls or living areas.
  4. Oversized or Undersized Chimneys – An improperly sized flue can lead to poor draft conditions, causing gases to spill rather than venting correctly.
  5. Appliance Malfunction – Defective or improperly installed heating appliances can produce excessive CO or fail to vent correctly.

“But We Haven’t Had Any Issues…”

CO poisoning doesn’t always happen suddenly—it can accumulate at low levels over time, leading to chronic health problems before an acute event occurs. Symptoms like headaches, dizziness, nausea, and confusion are often mistaken for other illnesses. Worse yet, prolonged exposure can be fatal.

Prevention Is the Only Safe Option

The fact that CO is undetectable without specialized equipment makes it one of the most insidious dangers in a home. Proper maintenance, inspections, and ensuring your system meets minimum safety standards are the only ways to protect your household from this invisible threat.

Posted on

How to Communicate the Hidden Danger of Thermal Decomposition, aka “Pyrolysis”

As an inspection professional, one of your most critical responsibilities is educating homeowners about the risks associated with heating systems, particularly the often-overlooked hazard of thermal decomposition (aka pyrolysis). Many homeowners believe that because they have used their fireplace, heating appliance, or chimney for years without an issue, their system is safe. Your role is to help them understand why this assumption can be dangerously misleading.

Key Concepts to Explain to the Homeowner

1. What Is Thermal Decomposition?

Thermal decomposition is a slow process where combustible materials—like wood framing, insulation, or drywall—break down over time due to continuous or intermittent exposure to heat. Even if the temperature never reaches the textbook ignition point, repeated exposure as low as 170°F can weaken the material. When conditions are right temperatures as low as 170°F have been reliably documented to lead to ignition. That is why listed systems are tested. If they exceed 170°F in concealed areas they fail their listing tests.

Homeowners should understand that this process is gradual and may take years to become a problem, but when the right conditions align, a fire can start inside walls, ceilings, or hidden areas without any warning.

2. Why It’s a Concern

The most dangerous fires are the ones you never see coming. If materials around your heating appliance or chimney have been slowly degrading for years, it only takes a little extra heat—maybe from a larger fire, prolonged burning, or a new homeowner’s different usage habits—for ignition to occur.

At this point, show the homeowner any signs of heat damage, charring, or clearance violations that could contribute to thermal decomposition.

3. What Causes It?

Give homeowners relatable examples:

  • Improper Installation – “If insulation or framing was installed too close to the fireplace, stove, or chimney, it can break down over time and may transfer heat to adjacent combustibles.”
  • Liner or Chimney Damage – “A cracked or deteriorated chimney liner can let heat escape into areas not designed to for inspection or to contain combustion byproducts.”
  • Oversized or Undersized Inserts – “If an insert was added that doesn’t match the original fireplace’s design or isn’t tested for that specific application, it might create excessive heat transfer to nearby combustibles.”
  • Changes in Use – “Maybe the system was used infrequently before, but increased use, burning hotter fires, or using different fuel types can accelerate the problem.”

How to Present Your Findings

1. Keep It Factual

Homeowners may feel defensive or overwhelmed, especially if they have used their system for years without issue. Avoid scare tactics and instead focus on the facts:

“This isn’t about whether there’s been a fire before—this is about how heat exposure over time can lower the ignition temperature of materials around your system.”

2. Show, Don’t Just Tell

Use visual evidence whenever possible:

  • Photos of damage – Show cracks, charring, or clearance violations.
  • Infrared imaging (if available) – Demonstrate heat transfer issues.
  • Code references or manufacturer specifications – Point out the required clearances and how the system compares.

3. Offer Clear Next Steps

Homeowners need to know what action to take:

  • Further Inspection: “A Level III chimney inspection can determine if there’s hidden damage or clearance issues behind the walls.”
  • Repairs or Modifications: “The liner needs replacement, damaged materials need to be removed or replaced, or additional protection may be required to bring the system up to meet or exceed minimum standards.”
  • System Replacement: “Where significant thermal decomposition or charring has occurred, continued use is not recommended, and replacing or redesigning the system is the best course of action.”

Handling Homeowner Pushback

Homeowners often respond with: “But we’ve never had a problem before.”

Your response should emphasize prevention: “That’s exactly why thermal decomposition is so dangerous—it takes years to develop, but once the materials are weakened, it only takes a little extra heat to cause ignition. This is why professional inspections are so important. We’re catching issues before they lead to a fire.”

Final Thoughts: Your Role as an Educator

Your job isn’t just to inspect—it’s to inform and empower homeowners to make safe choices. By explaining thermal decomposition clearly, showing them evidence, and providing actionable next steps, you can help them understand and address this hidden fire risk before it becomes a disaster.

Homeowners trust your expertise. The more clearly and confidently you communicate the risks, the more likely they are to take the necessary steps to ensure their home is safe.

Example Text to Include In Your Reports

If used combustibles too near one or more appliances, fireboxes, chimneys, or systems may overheat and potentially ignite, leading to a structure fire.

THE HIDDEN DANGER OF THERMAL DEGRADATION
You’ve used your fireplace, heating appliance, chimney, or vent for years without a problem—so it must be safe, right? That’s the trap. Thermal degradation (pyrolysis) is a slow, silent threat. Combustible materials and insulation too close to a heat source—whether a fireplace, stove, furnace, chimney, or vent—can break down over time with exposure to temperatures as low as 170°F. As this happens, they require less and less heat to ignite. If minimum standards are not met and thermal degradation has occurred a routine fire or normal operation could be enough to start a hidden blaze inside your walls.

What’s Makes A System Hazardous?
1) Bad Installation: Combustibles or insulation placed too close to the appliance, chimney, or vent.
2) Hidden Damage: Cracks or damage in the liner, firebox, or venting allow heat to escape, accelerating thermal degradation.

When the conditions are right, a fire can start where you’ll never see it—until it’s too late.

“But We’ve Never Had a Problem Before…”
That’s exactly why fires from thermal degradation are so dangerous—they take years to develop. Maybe you’ve only used your appliance occasionally, but what happens when usage increases? What if a new owner burns hotter, longer, or more often? That unseen damage doesn’t go away. It just waits.

Heating systems don’t get safer with time—they get riskier as the system itself, or the materials around it, degrade. The only way to control that risk is to take action before a fire happens.

Posted on

10/2024 IRC CODE UPDATE

The following sections were updated (with updates in bold) in the 2024 code book. Please review these at your earliest convenience. Note this may not be all inclusive:

Chapter 10

  • R1001.11 Fireplace clearance
  • R1003.18 Chimney clearances
  • R1004.4 Unvented gas log heaters (the change is actually about fireplace inserts)
  • R1005.9 Factory-built chimney offsets
  • R1006.2 Exterior air intake

Chapter 18

  • No changes noted.

Chapter 24

  • G2401.7 (304.1) General
  • G2407.12 (304.12) Protection from fumes and gases
  • G2411.1 (310.1) Pipe and tubing other than CSST
  • G2411.3 (310.3) Arc-resistant CSST
  • G2414.6 (403.6) Workmanship and defects
  • G2414.9 (403.9) Metallic piping joints and fittings
  • G2415.8.2 (404.8.2) Conduit with both ends terminating indoors
  • G2415.14.2 (404.14.2) Conduit with both ends terminating indoors
  • G2417.1.2 (406.1.2) Repairs and additions
  • G2417.4.1 (406.4.1) Test pressure
  • G2417.5.1 (406.5.1) Detection methods
  • G2417.7.3.1 (406.7.3.1) Abandoned fuel gas piping
  • G2420.5.3 (409.5.3) Located at manifold
  • G2422.1.4 (411.1.6) Unions
  • G2425.7.3 (501.7.3) Connection to masonry fireplace flue
  • G2427.5.8 (503.5.9) Cleanouts
  • G2427.14 9503.14) Automatic vent dampers

Commenting for the 2027 Edition – Group A Codes (including the IBC – E, IBC – FS, IFC, IFGC, IMC, IPC, IPSDC, IRC – M-Chapters 12-23, IRC – P-Chapters 25-33, ISPSC, IWUIC) closed January 8, 2024. No comments were submitted by me or on behalf of the NCSG as I had not yet been appointed.

Commenting for the 2025 – Group B Codes (including the Admin, IBC – G, IBC – S, IEBC, IgCC (Ch. 1 & App M), IPMC, IRC – B-Chapters 1-10, IZC) opens October 15, 2024 and closes January 10, 2025.

In 2026 comments from prior years for both Group A & B Codes will be heard and voted on by the appropriate committee. Public comment hearings will take place as necessary.

Please send any suggestions for comments, issues, or conflicts to [email protected] and I can add them to the list for commenting during the next comment period. I will reach out regarding any ideas for possible comments submitted.

***Daniel A. Freeman is a member of the TC-0103 and TC-0127 Technical Committees as a Commercial-Industrial User, an official NCSG representative to the ICC organization, and a member of the NFPA211 committee.

Posted on

🔥Introducing the IF4🔥

We’re thrilled to announce an exclusive offer for pre-orders of the IF4 Camera Kit. From now until the end of the NCSG Convention, take advantage of a $57 discount on all pre-orders using the coupon code: IF4PREORDER. This amounts to 10% the case only option, but it applies up to all larger kits!

Don’t miss this opportunity to be among the first to experience the future of chimney inspection technology at an unbeatable price. Embrace the future of your profession today with the IF4 Camera Kit and revolutionize the way you inspect chimneys forever.

2024 Product Updates:

  • Design updates to prevent snagging and better secure and support both lights in the housing
  • Redesigned whisker retention
  • Thicker buttonlock base to improve strength and durability
  • New cover doubles as the retention method for the top and side light
  • Color options available (Black)

The new kit with the guard for the side light is roughly the same width as the old IF3 with the light installed while shrinking in a little in height and depth. The side guard adds a tapered protector above and below the side light to help assure that light won’t break if you snag something in a tall flue. That said you still shouldn’t yank on the camera or housing if you feel it hanging up on something. Simply turn the rods and gently pull down until it releases.

  • 5.25″ H x 3.875″ W x 1.375″ D – IF3 Dimensions with the Side Light Installed
  • 5″ H x 4″ W x 1.313″ D – IF4 Dimensions

Watch the video to learn more about the exciting features of the IF4 Camera Kit.

Compare the new IF4 to the old IF3

Preorders will ship out following the NCSG Convention in Orlando!

Reserve your new case today and transform your inspections!

Posted on

Notes Update – January 2024

This will begin a routine of posting changes made to notes and informing you of any new notes created. The full content of the pre-written notes will not be posted, but only the titles of the notes changed or added.

Wishing you continued success in 2024!

Notes added (new):

  • FB0291FIREBOX: Minimum factory-built fireplace framing dimensions or sizing not met
  • FB1522HORIZONTAL: Horizontal wall penetration improperly performed

Notes updated:

  • FB0620DOOR/GLASS: Unlisted/aftermarket/improper fireplace doors
  • FB0800APPLIANCE: Clearances to the appliance body not met in the chase or wall cavity
  • FB0270FIREBOX: Air cooled firebox channels present
  • FB0280FIREBOX: Air cooled firebox channels compromised/modified/altered/blocked
  • FB0290FIREBOX: Updated title of note from “Fireplace opening clearances NOT met” to “Fireplace opening clearances NOT met to mantel, surround, other combustibles”
  • FB0291CHIMNEY: Improperly sealed factory-built chimney or vent system
  • FB0800APPLIANCE: Clearances to the appliance body not met in the chase or wall
  • FB0914IDENTIFICATION: Gas Insert is present in a factory-built fireplace
  • FB0960CHIMNEY: Existing piping not approved by fireplace manufacturer or approved pipe improperly modified
  • FB1170CAP: Chimney or vent termination clearance to combustibles not met
  • FB1521WALL THIMBLE: Required wall thimble missing changed to “FB1521HORIZONTAL: Required wall thimble missing
Posted on

Editing Reports in Adobe Acrobat Pro from the Office

As a technician you can always copy a previously submitted report, edit any entries you want and resubmit the report, but if you have an office staff that reviews and then sends out the final report this may become cumbersome at times. Use Adobe Acrobat Pro in the office to bypass this bottleneck.

At The Chimney Doctor their techs submit reports throughout the week. They are automatically emailed to their office staff who reviews the reports prior to sending them to the customer. During this review if there are major substantive changes that need to be made they kick it back to the technician and let them know they need to update their report. If only minor changes are needed then they use Adobe Acrobat Pro to edit the pdf and correct minor formatting or spelling issues prior to sending it out.

Here is a video walkthrough of that process.

Posted on

Reordering Repeat Groups

Click “Reorder items” below your selected repeat group.

The wording the bottom will change to read “Done reordering”. Now click no hold the dashed lines to the right of the item you wish to reorder. Drag it up and drop it where you would like it.

Now click “Done reordering” and congratulations you have now reordered your items. They will export into the pdf in this order.

Last updated 5/2/2023

Posted on Leave a comment

Calculating Firebox Clearances in a Corner Masonry Fireplace

Figuring out firebox clearances where a masonry fireplace sits at 45 degree angle in the corner can be difficult and access is rarely available. The big question is whether or not there is even space for clearances to have been met in the first place. Knowing this can be the difference between guessing or recommending a Level III inspection with some indication of what you should find.

We built this calculator to help our techs address and find these issues and have now built it into our app for you to benefit from. In the industry today this is the first and currently only calculator built to calculate the required dimensions.

Open up the v3.51 form inside the app, scroll down, and select “OPTIONAL CALCULATORS AND WORKFLOWS”. This will be located just below the sections for appliances and photo documentation.

Click “Select Items”.

Then select “Masonry Fireplace in 45-degree Corner – Clearance Calculator” and click “Done” at the top right of the page.

You will now be back on the prior screen. Find the section for the 45-degree clearance calculator and select “Add Item”.

Now scroll down and select what type of firebox is present:

  • a masonry firebox with a 2” firebrick lining
  • a steel form firebox
  • a masonry firebox without a firebrick lining or where the firebrick liner is thinner than 2”

Your selection will alter the information in the boxes below that specify minimum material thickness and air space required.

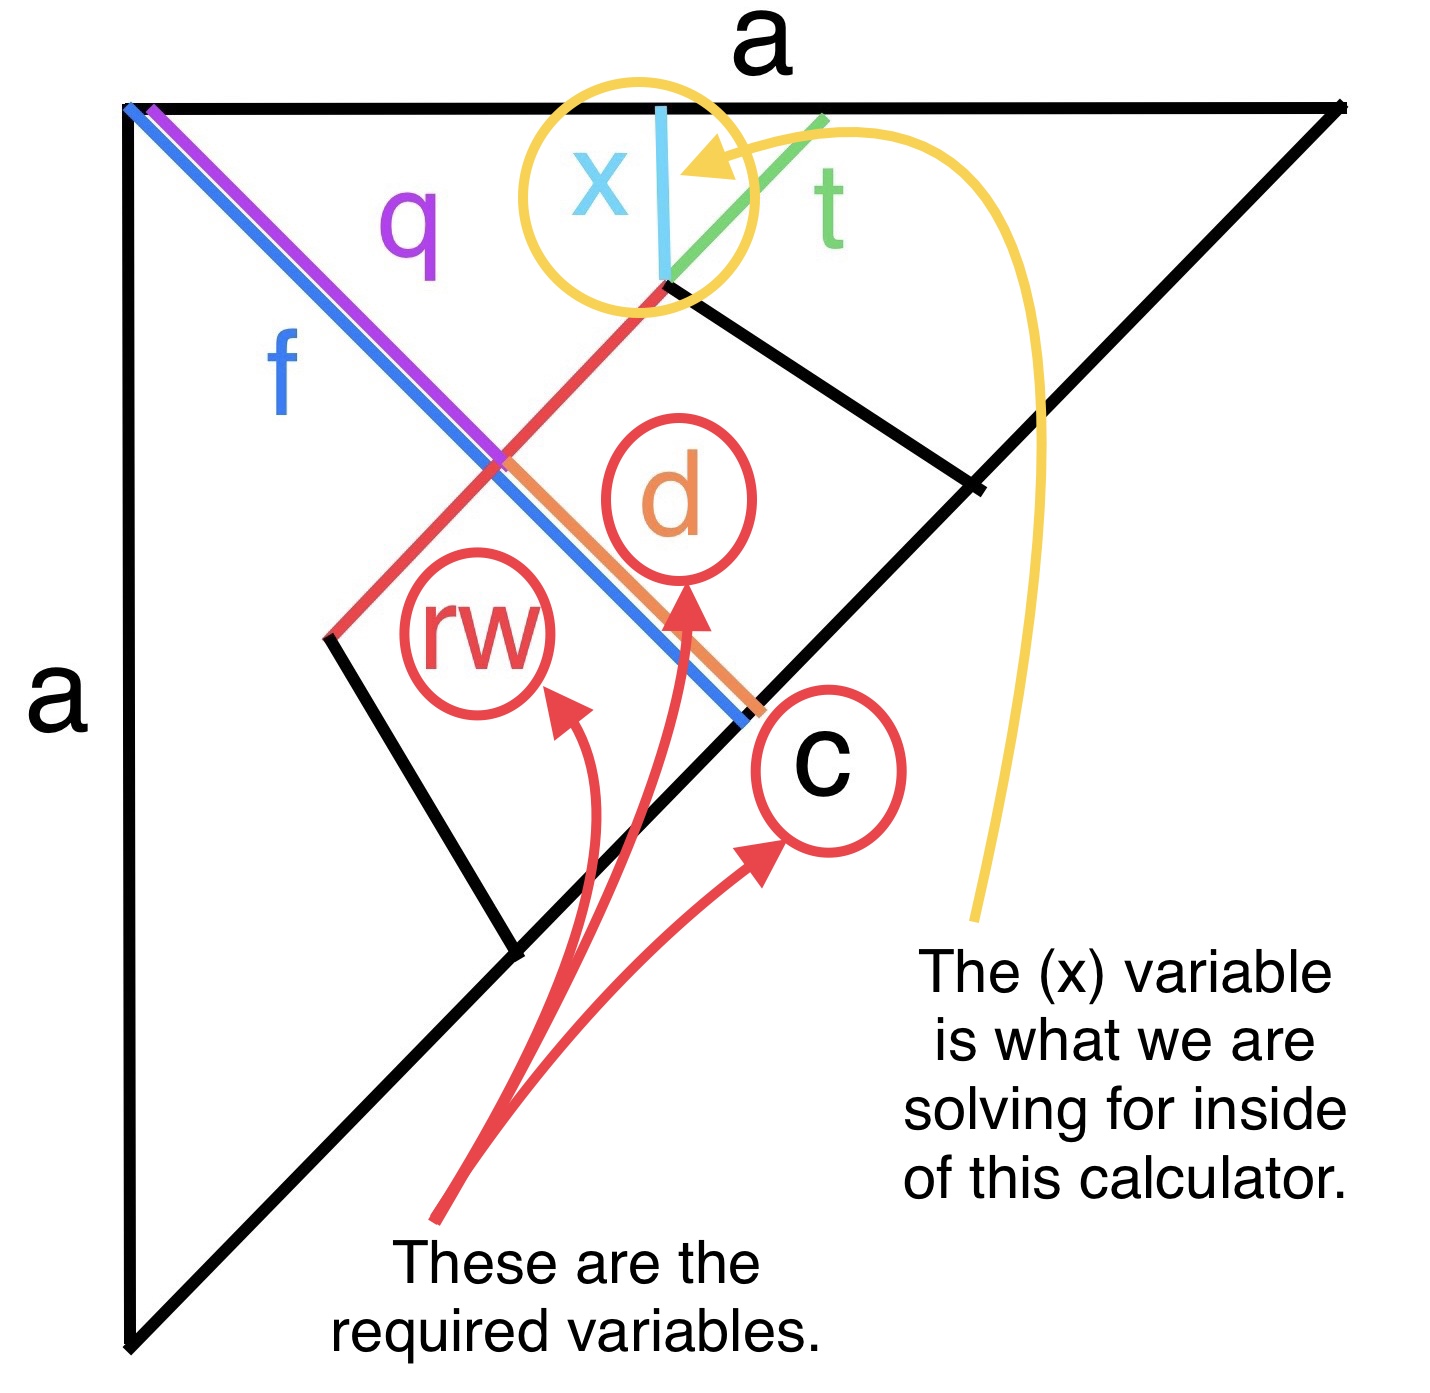
Now input the required variables:

  • (c) wall-to-wall structure width is a measurement of the distance from one corner of where the angled structure or veneer meets the adjacent wall of the structure, across the fireplace opening, and over to the other corner of the veneer or fireplace facing.
  • (rw) Firebox Width at Rear is the distance from one back corner of the fireplace to the other.
  • (d) Fireplace opening depth to outside facing materials is a measurement from the back of the firebox forward to the outside or front edge of the facing material. This edge will be the surface closest to the edge of the hearth extension. It generally extends beyond the firebox or firebrick and even with or past any lentils present supporting veneer materials.

Following your input of the required variables the form will calculate the potential maximum space available between the rear corner of the fireplace and the adjacent wall. If there is not enough space present to meet the minimum material thickness and air space requirements based on your prior selection it will show as a negative (-) number. If there is potentially more space than required you will see a positive (+) number.

If you have a positive (+) number this does not indicate that clearances are met, only that enough space is present they could have been met. If the masonry thickness varies or is thicker than the minimum required, or if additional materials were used to seal any air space that was present, clearances may still not be met. Again this only verifies whether it is possible for there be enough space. Only visual inspection can positively verify that ample space is present between the masonry structure and surrounding combustibles.

Using this information in h our reports at the moment is not automatic. You will need to screenshot the data used and add a photo section to your report to add this information. This will give you the freedom to insert it where you would like in your photo documentation section.

A diagram of what is being measured is shown below.

Please let us know if you have any questions as you use the calculator and if you don’t have the app get your device logins setup today so that you have access to it.

Last updated 5/2/2023